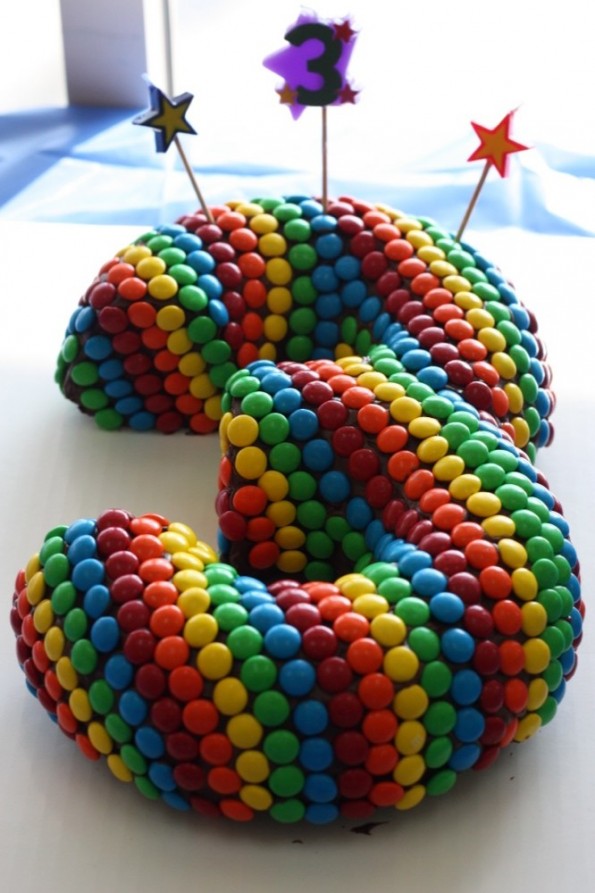
I recently went to a birthday party and my friend made this cake for her son! She had an amazing 3rd Birthday Cake Idea and I wanted to share it.
All handmade by my crafty friend!
Talk about AH-MAZ-ING. So creative. I was asking her about it and she said it would seem that the M&Ms would have taken a long time, but they only took her about an hour!
This is what she said she did:
Take two bunt pans and bake your desired flavor of cake – you could even make two different kinds.
Cut the two cakes so they become the 3 shape (obviously, you can test this by cutting a little at the time).
Flatten out the two parts where they attach (she said to put a little frosting where they attach so they stick better).
Ice the whole cake with chocolate icing
Pattern the M&M’s like the picture above.
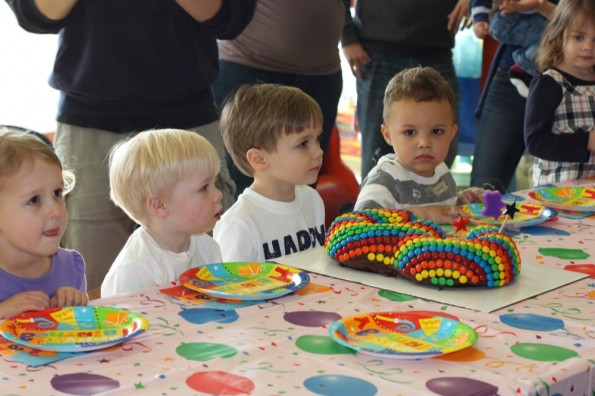
And you did it…. righhhhhhht. I do think this cake is simple if you pay close attention to detail by taking your time. Here’s the sweet birthday boy blowing out his candles:
Blowing out his “3” cake!
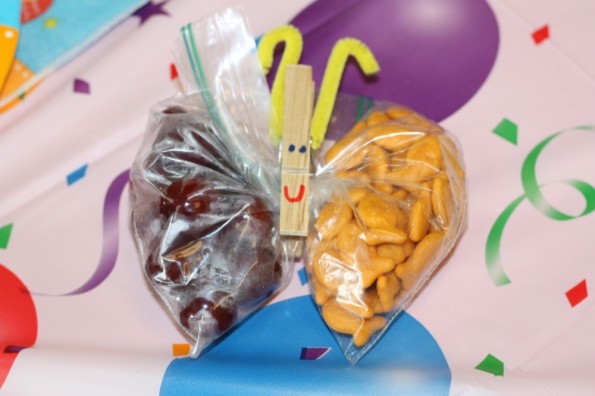
She also had something else cute at the party that I would share. Each child had pizza to eat and one of these snack bags:
Awesome idea for a snack bag!
Such a fun and creative party! I might have to steal some of these ideas! Happy party planning!
At this point in quarantine, you’re probably running out of things to do with your kids. They’re tired of you and your activities and they just want to play with their friends. One thing that can help take their minds (and yours!) off their frustrations? Food!
Food is the best way to soothe your soul and your body. Now I know, you’re probably tired of cooking at home too. You need to figure out what to make, how much to make, decide if the kids will eat whatever leafy green you put on their plate. What if I told you there was another way?
I recently discovered the air fryer and it has changed my life. You might think that the last thing you need is another kitchen gadget but this one is gold. Why? It can turn junk healthy and you can make it with the kids! There are so many recipes to make with an air fryer that the kids will love. And the upside is that it doesn’t use any oil. This means you can show your kids how to make it without hurting them and you won’t feel guilty about feeding them all that fatty oil because there isn’t any!
Here are five finger foods to air fry for your picky eaters. They can’t say no to this!
French fries
Corn dogs
Pizza
Onion rings
Mozzarella sticks
My personal favorite snack is jalapeno poppers– how can you go wrong with spicy cheese? But the fact that it is so oily stops me from making it very often. I can convince myself that eating that much cheese isn’t bad for me but I just can’t reconcile frying the poppers in so much oil. With my air fryer, the oil is taken out of the equation and I can enjoy my jalapeno poppers more often than before!
If you’re looking for more quick recipes with a little more nutrition in them for adults, check out this list of popular air fryer meals that you can make for the whole family. Better yet, help the kids make the recipe and let them learn that healthy food can be just as delicious as their favorite fast food!
The letter “I” is an important one for preschoolers to learn. However, this letter can be tricky because, like the other vowels, “I” makes two different sounds.
You can hear the “long I” in many words your preschooler already knows – words like “smile”, “time”, and “night-night”. “Short I” also crops up in plenty of common words like “fish”, “sit”, and “tickle.”
For this letter with TWO sounds, it only makes sense to have TWO different fun activities. First up – homemade Long-I ice cream!
Whipping up a micro-batch of ice cream at home is quick, fun, and uses real ingredients you probably already have on hand. Here’s what you’ll need:
1 gallon-size plastic bag
1 sandwich-size plastic bag
1 cup half-and-half
2 Tbsp sugar
½ tsp vanilla
Ice
¼ cup salt (rock salt or kosher salt work best)
Add your half-and-half, sugar, and vanilla to the sandwich-size bag. Close it up, eliminating any air from the bag as best you can. (Make sure the bag is completely sealed – you don’t want salt getting in and ruining the ice cream!)
Place your bag of ice cream mix into the gallon-size bag. Fill the gallon-size bag about halfway with ice, then add your salt. Seal up the gallon-size bag and shake, shake, shake! After shaking for 6-8 minutes, remove the sandwich-size bag. Rinse it well with cool water to remove all the salt, then squeeze into a bowl and enjoy.
For your next batch, add a little chocolate syrup, peppermint extract, fresh fruit, or crushed candy. You could even try a dash of food coloring to create something totally unexpected. You definitely won’t find blue vanilla with strawberry and chocolate chips in any grocery store.
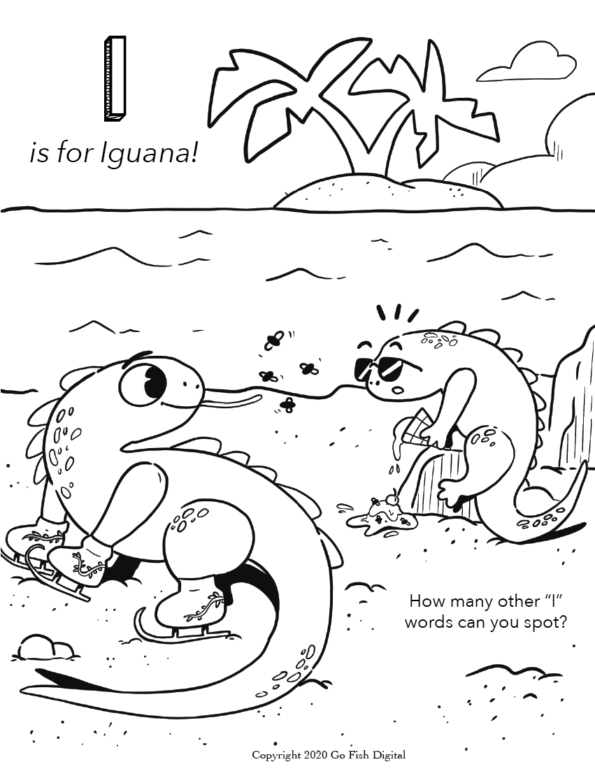
When your little ice cream chef is ready to move on, share the coloring page below. See how many “I” words you can find together.
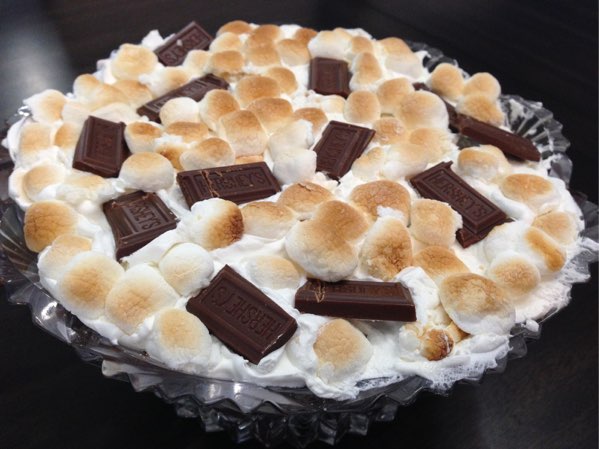
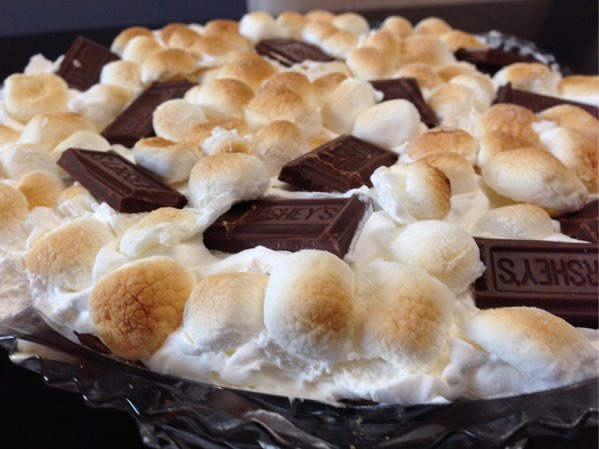
I have a new favorite now! Brownie S’mores Trifle! I found this recipe on momendeavers.com. It was AWESOME! It really looked fabulous and fancy as well! It looked like I made this really complicated delicious dessert for some friends who came for dinner, when really it whipped together so fast!
It has a crunchy graham cracker brownie crust and toasted marshmallow and chocolate top! So so so good!
This is such a yummy trifle. I can’t wait to have it again! Give it a try!
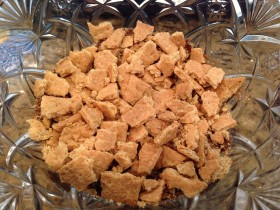
Bake your brownies as directed. Make you instant chocolate pudding as directed. Once the brownies are cooled, cut them into small chunks.
Next, the whipped topping from the tub and mix it in a separate medium bowl with all of the marshmallow cream.
In a trifle dish or large bowl add about half the brownies. Then top the brownies with about half of the chocolate pudding.
Crumble about half of the graham crackers (or break into small pieces) on top of the pudding, covering it completely.
Now add half of the whipped topping/marshmallow cream mixture to the top of the graham crackers.
Repeat all three layers again (brownie, pudding, graham crackers, whipped topping mixture).
Now for the best part! Spread you mini marshmallows out on a cookie sheet (do not put tin foil down first). Broil them in the oven until they are nice and toasted brown. About 10-15 seconds. Do not even close the oven door completely or take your eyes off them for a second or they will burn, and quickly!
Let them cook and then sprinkle them on the top of the trifle. Break the Hershey's bar into squares and spread over the top of the trifle.
It’s true… I did not survive the holidays well. I threw in the towel and just let myself enjoy every minute of it. This means that I gained 10 lbs from all the delicious food!
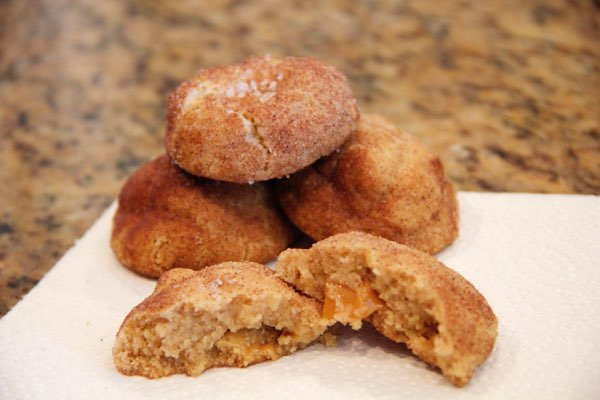
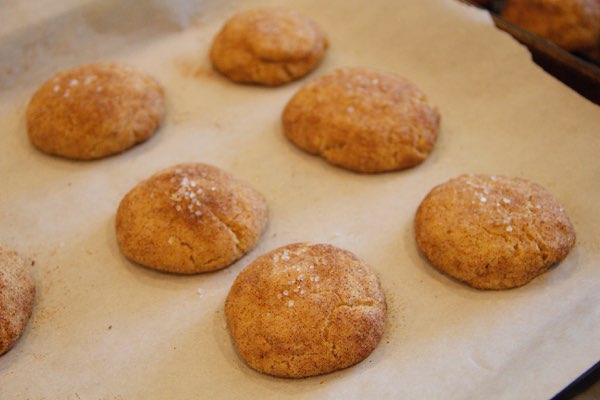
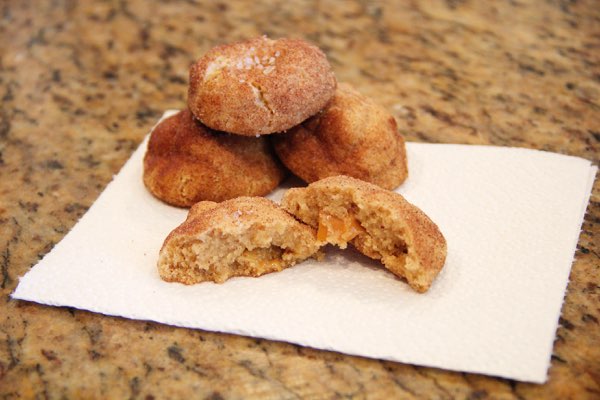
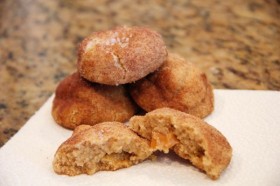
One of my favorite cookies I tried this holiday were these Salted Caramel Snickerdoodles from twopeasandtheirpod.com. LOVE, LOVE, LOVE the sweet and salty combination thing they have going on! So good! My kids loved them too and are now always asking me to make those “one yummy chewy caramel ones.” Good stuff!
Chewy and yummy with melted caramel in the middle!
Oh man… they are making me drool just looking at them. Dang after Christmas diet! Ha! If it weren’t for that I would be making them all over again!
Look at that sea salt sprinkled on top! Yum!
Okay, enough already. Here is the fabulous recipe! Let me know how they turn out!
Whisk flour, baking soda, cream of tartar, cinnamon, and salt together in a medium bowl.
Cut the butter into slices and brown it by heating it slowly on low heat in a skillet pan. Whisk frequently until the butter foams and brown specks start to from on the bottom of the pan. Remove the butter from the heat and let it cool to room temperature.
Combine brown butter and sugars in a mix until smooth. Beat in the egg, yolk, vanilla, and yogurt until combined. Then slowly add in your dry ingredients.
Chill dough for at least 30 min in refrigerator.
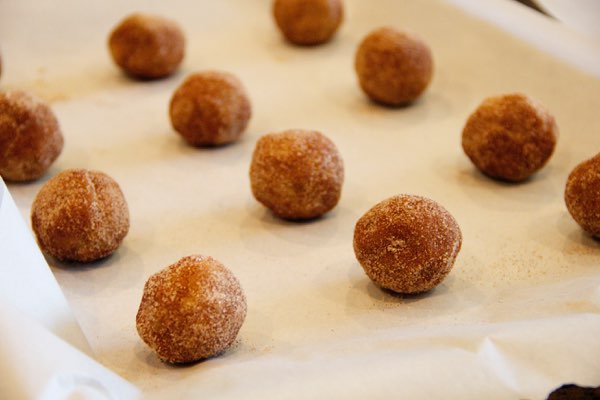
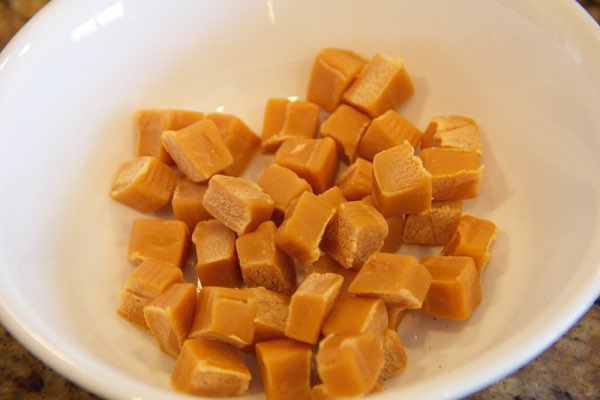
Preheat oven to 350 and roll 2 Tb of dough into balls. Place a piece or two of caramel in the center of the ball and wrap the dough around it.
Roll the balls into the cinnamon/sugar mixture and place on prepared cookie sheet on parchment paper. Sprinkle with sea salt.
Bake 8 - 10 minutes and cool on the baking sheet for 2-3 minutes until cooking is set.
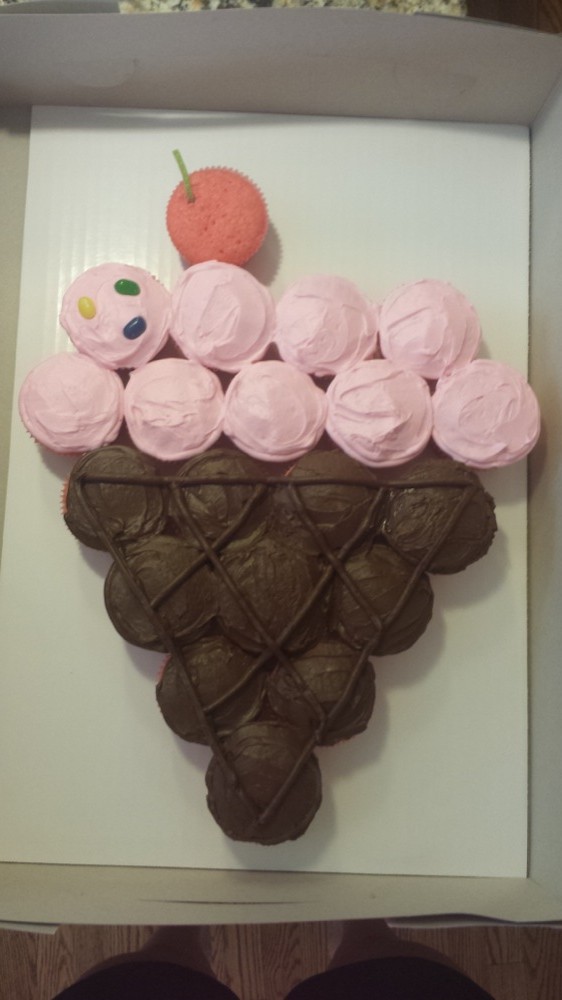
I always try making my kids some kind of cake. I usually google some things and they pick it out. Sometimes I steer them into “something that looks cooler and maybe a lot easier” type cake. My daughter picked this out and surprisingly it was SOOOOOOO easy and so adorable!
I found the image through Pinterest, but it wasn’t linked to anything, therefore I am not able to give credit for this cute cake idea.
What ya need is:
Cake box of your choice and ingredients listed.
Muffin pans.
Cupcake liners.
30ish jelly bellys.
One container chocolate icing.
One container pink icing (or white icing dyed pink)
Stem (green candy)
Tiny bit of icing dyed red
Here are my step by steps:
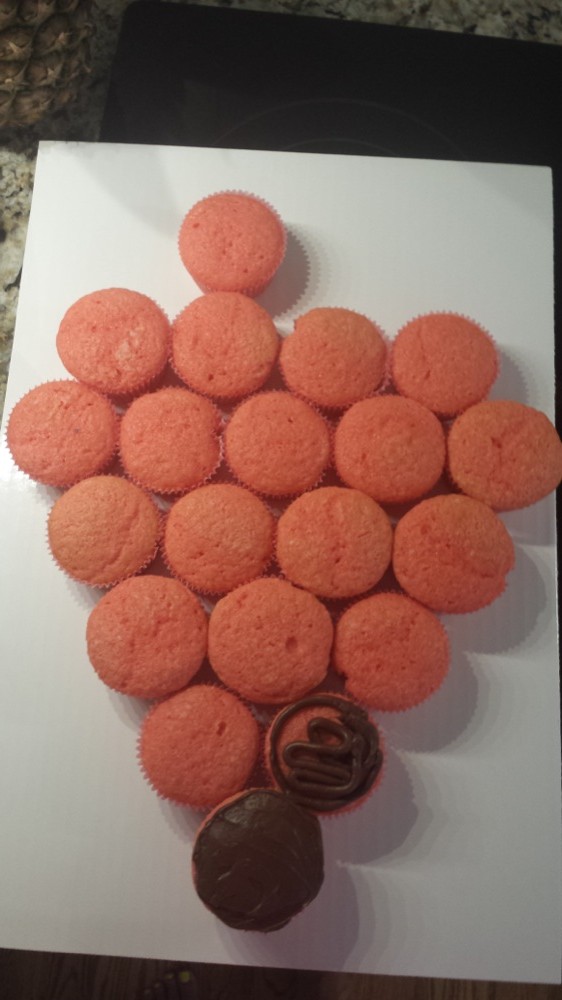
1. Bake your cupcakes according to package and arrange 20 of them like this:
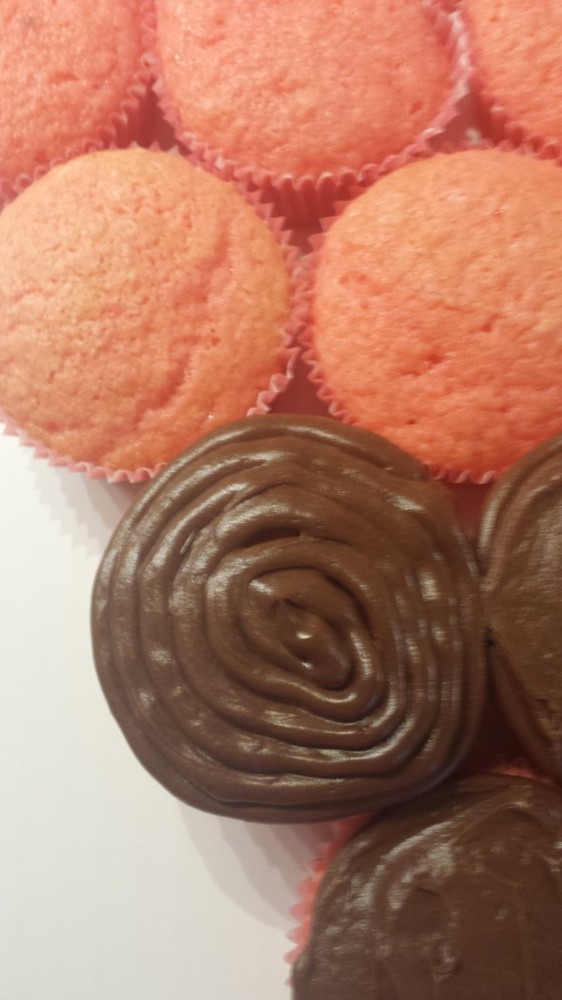
2. I started icing with just regular old chocolate icing. I did use a circular tip just because I wanted the outside of the cupcake to be even with icing. Some people may be good enough to do it with a knife. Then, I just used a butter knife to smooth it out.
3. Using the same circular tip, do the lines on the bottom of the cone!
4. Then you icing the pink the same way and put some jelly belly’s on it!
5. Lastly, you do the top (the cherry) red. And bam, you’re done.
I think this cake cost about $6 to make! I think it is so adorable!
Oh yeah, the ice cream theme is awesome too. Amazon has two cute things that you can use as favors! They have ice cream dishes and the fun cone popper thingy! Happy Party Planning!
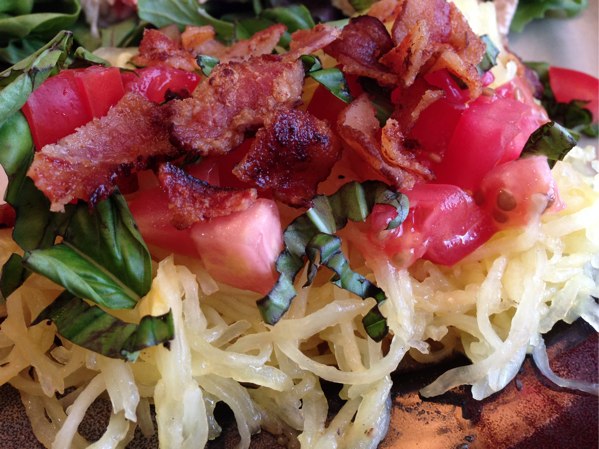
Summer time means eating lots of different fruits and vegetables. I LOVE eating spaghetti squash and have been trying all the different ways to eat it.
This is my all time favorite way to eat spaghetti squash! Sooooooo yummy! Everything tastes better with bacon! Ha!
INGREDIENTS:
Large spaghetti squash
Bacon (cooked and crumbled)
Fresh basil
Tomatoes (diced)
2 TB butter
Salt and Pepper
To cook the spaghetti squash, cut it in half and scrape all the seeds out. Then put the two halves face up on a cookie sheet. Add a TB of butter to each half and give it a little salt and pepper. Bake at 375 degrees for 40 -45 min. Let it cook for minute or two and shred with fork.
Top with crumbled bacon, diced tomatoes, and fresh basil.
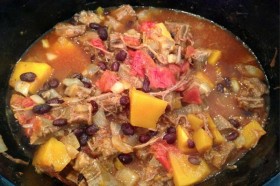
I have this favorite brisket recipe I love making. The problem is, it always leaves us with a ton of left overs! I often like to make it when I am cooking dinner for a new neighbor or a friend who just had a baby. It easily feeds two families.
This time I tried something different. I made chili out of it! I was inspired by this recipe from epicurious.com, but ended doing my own things since I didn’t have all of the other items needed for their recipe. Plus, it just doesn’t feel like chili to me without some beans in it!
I feel like the butternut squash really made the chili! It was delicious! I will be making this again probably every time we have left over brisket!
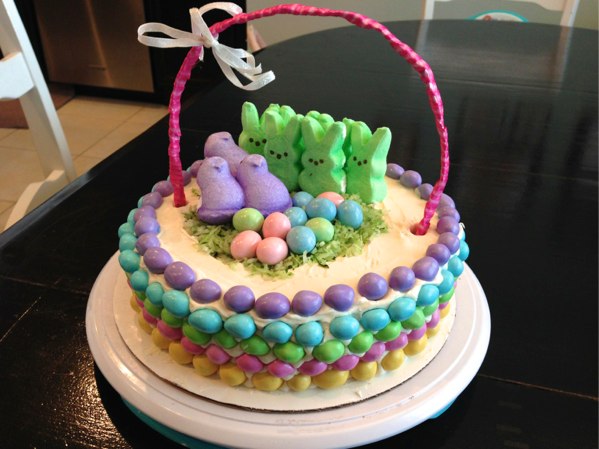
I saw this cake Allrecipes magazine. Its pretty cute and easy to make. I had some out of town company come for a few days so I made this for dessert for everyone. The kids loved the M&M’s on it.
Sorry about the cell phone shot. My camera battery wasn’t charged and the kids couldn’t wait any longer to eat the cake!
I used M&M’s on the sides (took 1.5 bags), marshmallow easter candy on the top, and coconut flakes mixed with a little water and green food coloring to look like Easter grass. I also cut a small round piece out of the top to fill with the “easter grass.”
The handle is just rolled up tinfoil wrapped with some ribbon.
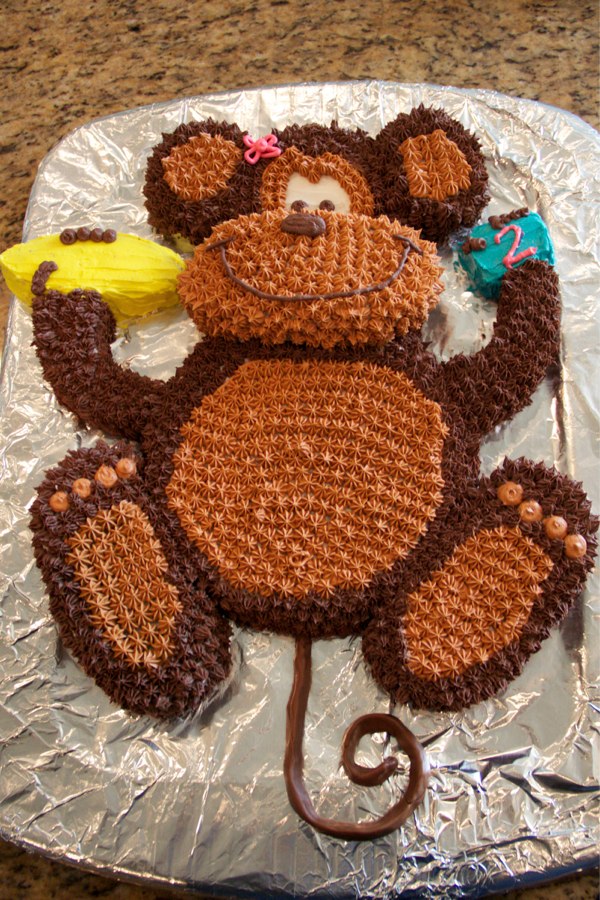
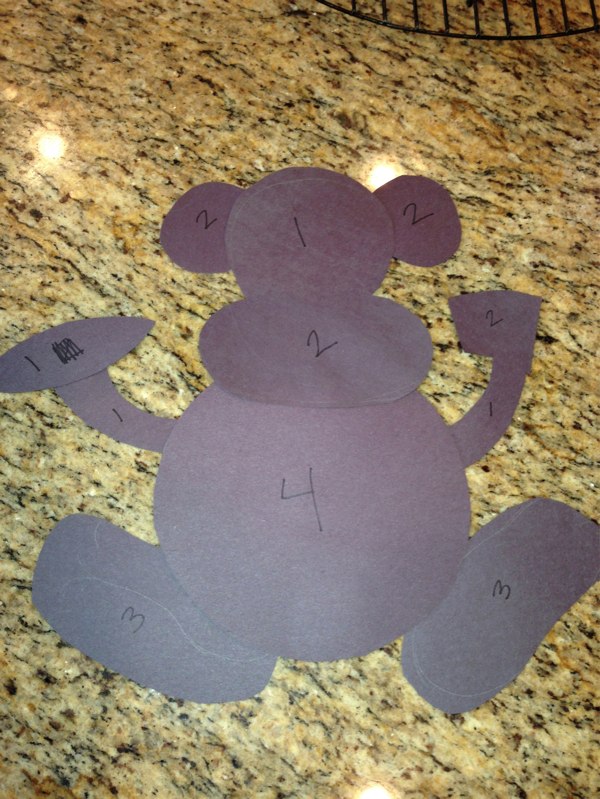
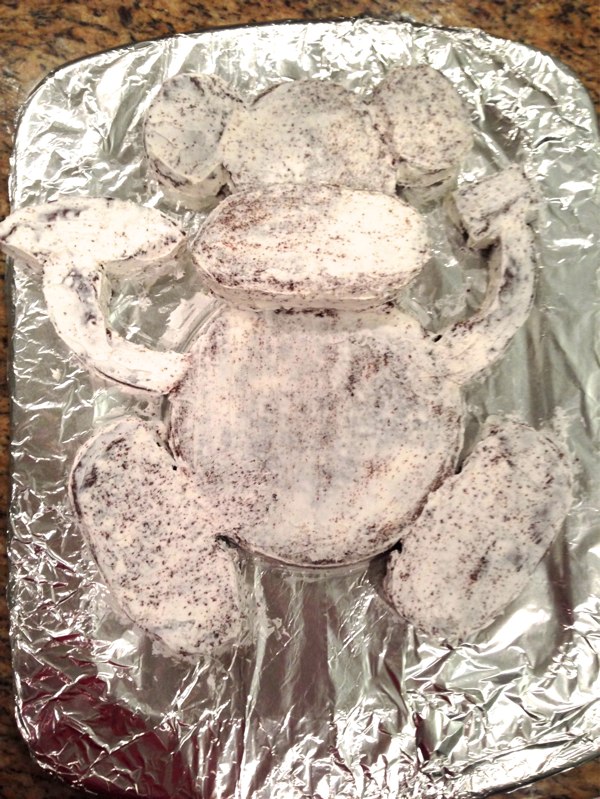
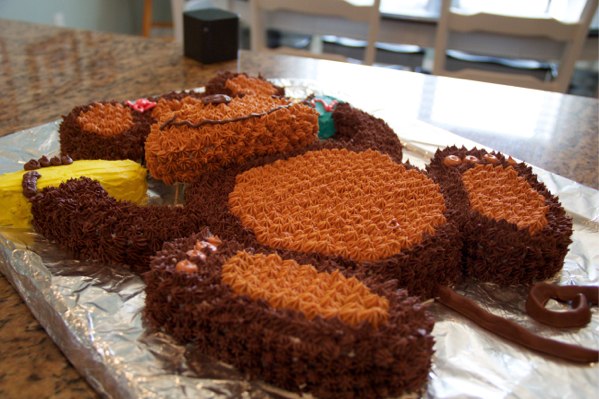
I recently made this monkey cake for a special 2 year old in my life. She loves monkey’s and is constantly singing “No More Monkey’s Jumping On the Bed.” It was pretty time consuming making all the stars for the fur, but it turned out awesome!
I researched lots of different monkey cakes, but in the end I used this one from My Daily SAHM Life as my model. I know I could have just ordered the monkey cake pan, but who wants to pay for a pan you will probably never use again???
I used 2 cake mix boxes and made 4 round cakes. I used Wilton’s buttercream icing and Wilton’s food colorings to get the desired colors.
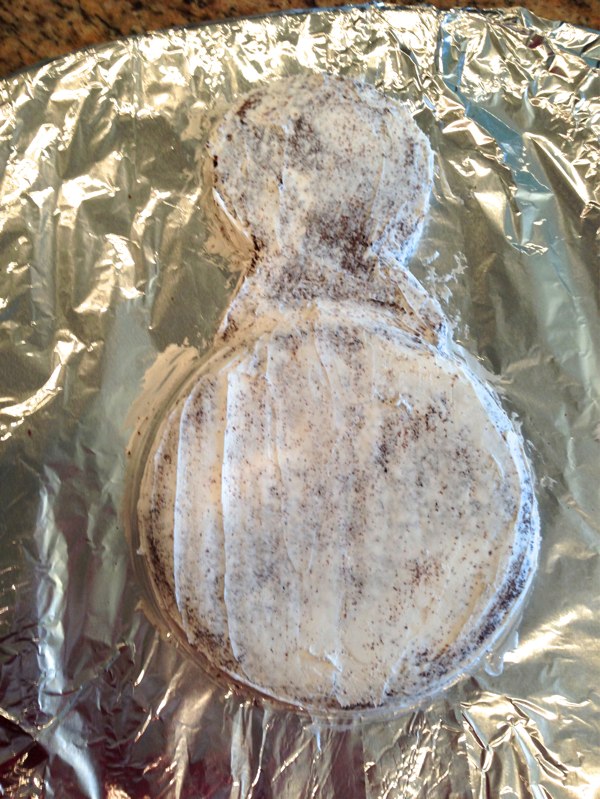
1. Make 4 rounds cakes. Take them out of their cake pans, wrap them in nonstick tinfoil or parchment paper and stick them in the freezer.
2. Using construction paper, cut out your pattern. I numbered each piece so I knew which cake I would cut it from to make sure all the pieces fit.
3. Once your cake is good and frozen, use your paper pattern to cut the cakes into their shapes. Freeze the parts until you are ready to start frosting.
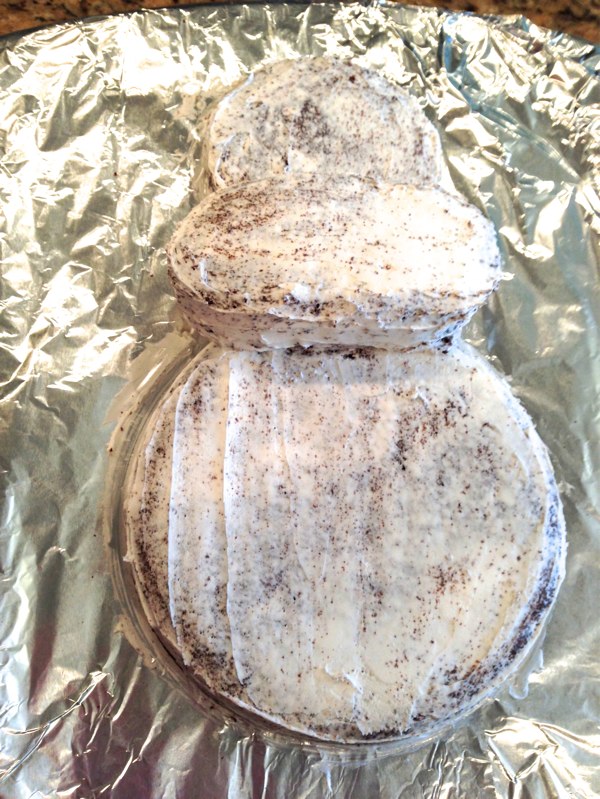
4. Do a thin crumb coat frist. Once the crumb coat is dry you can start frosting! I used a basic star tip.
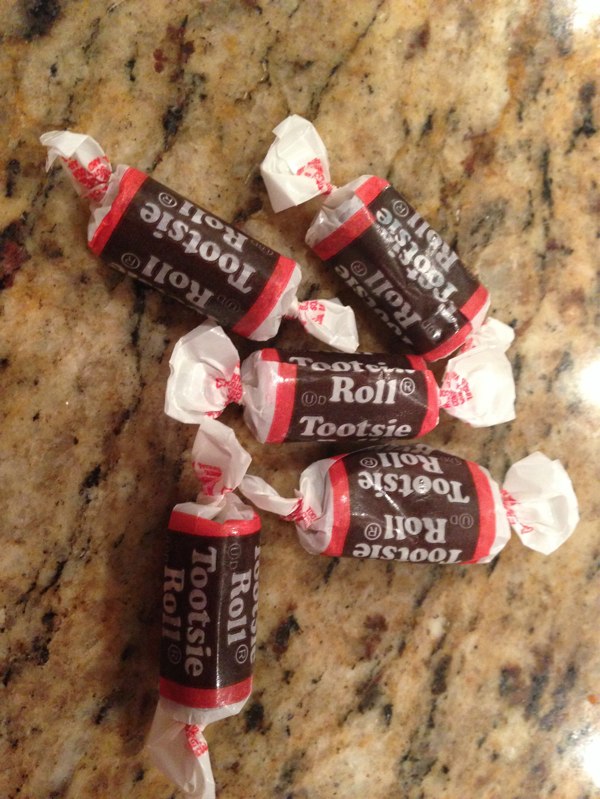
5. The tail is made from Tootsie Rolls. Just heat them in the microwave for a few seconds then mold them how you want.