Enchanted Mommy

Awesome 3rd Birthday Cake!

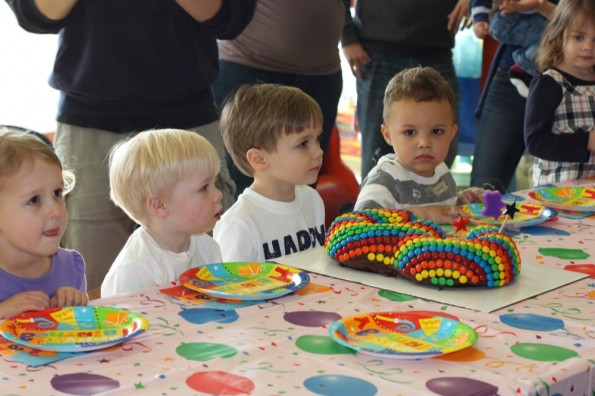
I recently went to a birthday party and my friend made this cake for her son! She had an amazing 3rd Birthday Cake Idea and I wanted to share it.

3 birthday cake
All handmade by my crafty friend!

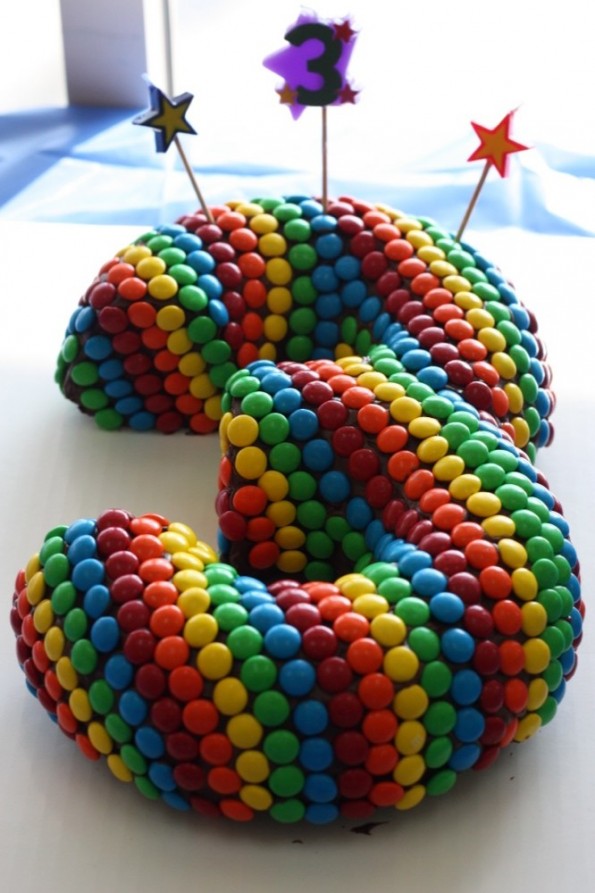
Talk about AH-MAZ-ING.  So creative.  I was asking her about it and she said it would seem that the M&Ms would have taken a long time, but they only took her about an hour!

This is what she said she did:

  • Take two bunt pans and bake your desired flavor of cake – you could even make two different kinds.
  • Cut the two cakes so they become the 3 shape (obviously, you can test this by cutting a little at the time).
  • Flatten out the two parts where they attach (she said to put a little frosting where they attach so they stick better).
  • Ice the whole cake with chocolate icing
  • Pattern the M&M’s like the picture above.

And you did it…. righhhhhhht.  I do think this cake is simple if you pay close attention to detail by taking your time.  Here’s the sweet birthday boy blowing out his candles:

Blowing out his “3” cake!

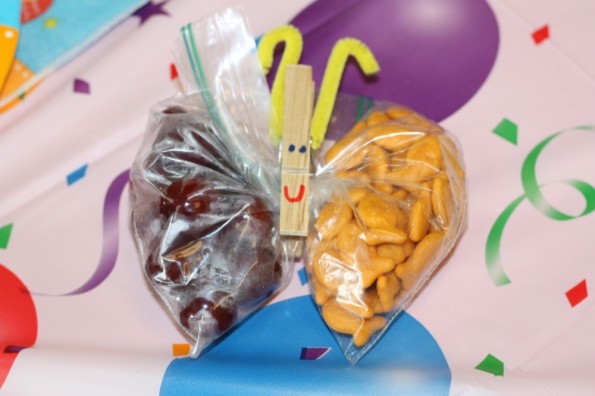
She also had something else cute at the party that I would share.  Each child had pizza to eat and one of these snack bags:

kids snack bag for party
Awesome idea for a snack bag!

Such a fun and creative party!  I might have to steal some of these ideas!  Happy party planning!

For other party ideas:
Ella’s 3rd Pancake and Pajama Birthday Party
1st Birthday Party Ideas
Cupcake Cake Idea
Lion Birthday Party
Super Hero Birthday Party 

Other bundt pan ideas:
 Too Much Chocolate Cake
Popcorn Cake 
Cream Cheese Monkey Bread

Remote with my kids: It’s not easy being a mom, teacher, and employee

Let’s face it — learning from home hasn’t been easy on a lot of our kids, or us moms for that matter. 

From giving up recess and friends to battling WiFi mishaps and technology barriers, we really have to give the moms a round of applause for all that they’ve done. 

My sons are six and ten, two ages that require a LOT of patience and attention from Mom and Teacher. Although it’s always been wonderful to come home to my boys after a day at the office, I’ve found it difficult to navigate this work-from-home life while my kiddos are also working too.

And I’m not alone, according to the National Women’s Law Center, over 800,000 women left the workforce to look after their children between August and September of 2020. Trying to balance the demands of motherhood and the demands of a full-time career has, at times, been entirely too overwhelming. 

Sometimes I feel like I’m letting down my colleagues. Sometimes I feel like I’m letting down my boys. And almost always I feel my arms being pulled in opposite directions, all at once. 

The light in all of this is how wonderful our school district has been throughout the last year. The transition, albeit hard, was made easier because Portland has some fantastic leadership in education. We were already connected virtually before 2020, and they’ve offered classes and tutorials to teach parents about remote learning.

So I wasn’t surprised when I came across this list of the top cities for remote learning, and Portland was ranked third! 

Although I’m blessed with where I live, I’ve read countless stories from other moms trying to grapple with this new way of life. A word of encouragement: You’re doing just fine. It’s okay to be an imperfect mom and an imperfect employee. We are not superheroes, and we’re probably not going to teach third grade math as well as Mrs. Matthews. 

I can’t wait to kiss my kids goodbye at our bus stop, but for now, I’m just going to try and do my best with what 2020 and 2021 have given us. Who knows, remote learning may be here to stay in some form or another.

Pinkalicious 1st Birthday

I cannot believe it, my youngest princess turned the big 1.  We decided to do a Pinkalicious family party.  Here she is!

marinbdaypic

I always take 1st birthday pictures of my kids.  I quickly did this one two days before her birthday so I could display it at her party.  In case you’re wondering, I got the romper and headband here.  It fit her perfect and ran true to size (she’s 17 lbs and I ordered 6-12 months).

I’m so mad at myself for not taking pictures of the food, but it included:
– chicken salad  and egg salad croissants
– butterfly pb & j sandwiches for the kids
– lumpia
spinach dip
 buffalo cheese ball
– veggie tray
– fruit salad
sausage cheese dip

I also took pictures of the drinks kind of late so they didn’t look the prettiest at this point:

IMG_8517

The best was the pink punch!  I thought it tasted so delicious!  I scooped the sherbet into the punch with an ice cream scoop.  The pink chevron straws are from Target.

My favorite was her “1” cake because it looked so cute, but was SOOOOOOO easy to make!

IMG_8468

I used a strawberry cake mix and funfetti icing.  I dyed the icing pink with icing dye.  It was so easy!  I did have to put the icing in the fridge for like 30 minutes after I mixed it because it was a little too loose.  I used a wilton 1M tip and started in the center and worked my way around.    I filled in the holes with the same tip in between the cupcakes.  It took me probably 10 minutes to ice!  I also put these edible pearls on there for a little extra touch.

Her smash cake looked very similar!

IMG_8469

This probably took me 5 minutes to ice.  I used this cupcake cake mold.  First, I put icing in between the two layers of cake and then did a very thin layer of icing on the top with a butter knife so the roses would stick well.  I used the same icing tip as above and just did little roses all over and added the pearls.  Remember, the rose starts in the center!  I bought the ribbon at A.C. Moore.

I also made chocolate covered pretzels and sugar cookies.  My mother in-law also made a delicious cheesecake.

IMG_8471

IMG_8472

I used my cookie cutters from my kit that I wrote about before.  I actually just bought pillsbury cold dough.  The letters looked rough until I iced them!  I thought they turned out pretty cute!

Here is the display of her “pink sweets” table.

IMG_8510

I’d say she enjoyed her cake!  I love how her handprint is on her face.

IMG_8548

Okay, so one more…..

IMG_8527

I also made cute pom poms for above her!

IMG_8559

I used 8 pieces of tissue paper for the center one, 7 for the dark pink ones and 6 for the small ones!

I’d say she had a pretty good 1st birthday!

IMG_8520

IMG_8466

Be still my heart!

I hope you have as much fun planning your little ones’ birthdays as I do!

Peanut Butter Fudge Brownie Trifle! Delish!

My family is big on trifle.  We have it at most get togethers and have tried a lot of different variations (peppermint, candy bar, fruit, cherry pie filling, oreo, etc…).  We love our trifle!

So when I came across this Peanut Butter Fudge Brownie trifle on www.howsweeteats.com I was shocked that I had never seen this kind before!  I couldn’t wait to try it!  So I got all the ingredients and planned on making it for our next family pot lock, but as it turns out two other people were already bringing dessert.  Bummer!

I ended up just making it for myself!  That’s right… don’t judge!  I wanted it, so I made it!  Ha!  Besides, I have three half monkey – half boy children at home that are always willing to gobble up desserts!

So this trifle was awesome.  My favorite variation of trifle thus far.  I think it was the peanut butter layer that did it for me… well that and the entire top layer of Reeses Peanut Butter Cups!  So yummy!

Loaded with Reeses Peanut Butter cups! Awesome!!!!

PEANUT BUTTER FUDGE BROWNIE TRIFLE
Brownies layer (any kind you like)
Whip cream layer
Peanut Butter layer
Chocolate pudding layer  (I used one box of instant pudding mix)
1 Bag Reeses Peanut Butter Cups

***Cut your brownies into cubes and put half of them along the bottom of your trifle dish.  After this you just put the different layers on in any order you like and then repeat.  Then top with sliced Reeses Peanut Butter Cups!  It’s so pretty at the end you will want to dig right in and start eating!

So here is the how-to on the layers:

Whip Cream Layer
2 cups Heavy Cream
3-4 Tb granulated sugar

*Beat heavy cream and sugar together on medium-high speed until stiff peaks form.  Stick bowl in the fridge until you are ready to put in trifle dish

Peanut Butter Layer
1 cup creamy peanut butter
8oz of whipped cream cheese, softened
1 cup powdered sugar
2 Tb milk

*Beat peanut butter and cream cheese together until creamy.  Add powdered sugar and mix well.  Add 2 Tb of milk.  Take 1 cup of your whip cream mixture from the fridge and fold it into the peanut butter mixture until just combined.

Now you are ready to layer your ingredients in your trifle dish!

Chewy M&M Chex Mix! So Yum!

This is one of my favorite snacks!  It’s really my mom’s genius recipe… she has been making it for as long as I can remember.  Movie nights as a kid, long car trip snacks, game night treats, party treats, or just because treats!  I always loved them and have many great memories eating them!  Later I began making them for my roommates at college and even later for my own family.

It’s easy to make and is seriously so good!  Perfect game time snack!  I couldn’t resist making it with Easter m&m’s!

Chewy M&M Chex Mix
1/2 box Golden Grahams cereal
1/2 box Honey Nut Chex cereal
2 cups shredded coconut
1 cup slivered almonds
1 bag m&m’s (any kind you like)
1 stick butter
1 cup granulated sugar
1 cup Karo syrup

***Mix cereal, coconut, and almonds in the largest mixing bowl you can.  Melt butter, karo syrup,and sugar in a saucepan over medium heat.  Bring to a boil stirring constantly.  Let it boil for at least two minutes, but keep stirring.  Poor over cereal mixture and mix using a strong spoon.  After a minute, dump in m&m’s and keep mixing.  I always add the m&m’s a minute later so that they don’t melt.  My mom would tell you to keep stirring until the mixture cools, but I cheat!  Once it is all combined well I spread it out on the counter on top of some parchment paper or tinfoil to cool.  These keeps it from getting all stuck together in one giant ball.

So yummy! I could just dive in!

Great snack to bring to a party!

**Update**

I just made the Christmas version of this recipe!  Check out the colors!

Love how you can make it for each holiday!  Merry Christmas!!

Love how you can make it for each holiday! Merry Christmas!!