by Dana Patterson on Oct 29, 2011
Because I have two girls, I’m an accessory addict! I just love them matching. However, even before I had my first daughter (but knew she was a girl), I was making different types of hair bows for her. This style is a newer design, but I think it is so cute!

Bow in my 2 year old's hair
First, I take the alligator clip and wrap it with ribbon all the way around it. This helps with it staying in fine hair (which most little girls have) and it makes it so the silver doesn’t show.

wrap one of the ribbons all the way around the alligator clip
Next, I take three different types of ribbon and cut it into about 6 inch pieces
**you can choose the length, just remember the width of your bow will be about half of the length you cut the ribbon.

my 6 pieces of ribbon
Then, you fold the ribbon in half (so you know where the center is) and you put glue across the fold.

fold ribbon to halfway and glue it down
Repeat with the other side.
Fold and glue all of your ribbons.

*all of the ribbons glued in the middle
Next, I glued the black ribbons in an x-shape and then the Merry Christmas ribbon and then the red. I put them on top of each other with the button on top and glue the bottom ribbon to the alligator clip and wahlaaaaa, we have ourselves a bow.

Finished bow!
Here are some of the others I have done for the girls!

A few of the Daisy bows that I have made
Couple of side notes:
- You can get all of the supplies at any craft store.
- You can use all types of ribbon for this bow.
- Sometimes I use thicker ribbon on the bottom.
- Play with different designs!
- Save your extra buttons from clothes!!
by Dana Patterson on Oct 27, 2011
Last weekend we went to husband’s parents house. It was a lot of fun! I decided to look up pumpkin patches there. They live in Virginia Beach and I only found one online! So, we gave it a shot. Ella had a lot of fun. It was no cox farms, but it was close and a different type of fun.
Something that really struck my attention was these really cute dragonflies made out of butter knives on the outside of a cage.

Here they all are hanging on the outside of a cage of animals.
Here is the close up:

Close up picture of the four knives made into a dragonfly.
I thought this was an awesome DIY. I would just go to a yard sale or even dollar store and pick up the butter knives. Cut off four tops and super glue them to one bottom and wahhhhlaaaa. I thought they would be so cute in a little girls room spray painted pastel colors! Fun fun fun and very creative!!
by Jamie Hinckley on Oct 26, 2011
My son’s first grade teacher asked me to be in charge of their class pumpkin this year. The class voted on one of their favorite book characters to create for the school pumpkin contest. Gerald the elephant won the contest so I started up on google to see the best way to create an elephant pumpkin.

Gerald the Elephant Pumpkin – The final product
I got the idea from Michaels.com and loved it for a class project because it had so many different pieces to it that it was easy to get all 25 kids to help with at least one part.

This is the book Character the class voted for
Materials:
1 large tall shaped pumpkin (for the body)
1 small round shaped pumpkin (for the head)
4 Styrofoam cones about 9 inches long (for the arms and legs)
12 half wooden robin eggs (fingernails)
2 wooden circles (eyes)
Black yarn (eye brows)
Black pipe cleaner (glasses)
Sharpie (to draw the mouth and pupils on the eyes)
Strong Tooth picks (to secure pumpkin heads together and limbs to the pumpkin)
4 artificial pumpkins (to glue together to make the trunk)
Cardboard (to cut ears out)
White paint (for the fingernails and eyes)
Grey paint (for the pumpkins, legs, trunk, and ears)
Instructions:
- Paint the pumpkins, cylinders, artificial pumpkins, and ears grey
- Paint the wooden half robin eggs and the wooden circles white
- After the pumpkins are completely dry, place four or five toothpicks in the bottom of the smaller pumpkin about halfway in. Carefully put the small pumpkin on top of the large pumpkin pressing the toothpicks into the larger pumpkin
- Glue the artificial pumpkins together in the shape of a trunk, then use a tooth pick to secure trunk to the pumpkin face
- Glue three fingernails to the large end of each cone and secure cones to the large pumpkin with toothpicks
- Use a sharpie to draw a mouth on the pumpkin and and pupils on eyes
- Use a hot glue gun or super glue to glue the eyes, eyebrows, ears, and glasses to the pumpkin
by Jamie Hinckley on Oct 13, 2011
Creativity and imagination are the most cherished parts of childhood. I love watching my little monkeys in their moments of crazy make believe games and stories.
My six year old came home from school today with a story he wrote about warriors and dragons. It was about him and his best friend using their super powers to battle the dragons and rescue both of their little brothers from the dungeon. He was so proud of his story. At dinner I asked what his favorite part of his day was. He said it was bringing his “book” home to show me. Oh how I love that little guy!
 This post is in honor of encouraging and developing creativity. The idea is to pick a project, tell the kids what they are making, and then give them all of the supplies they need. Then, let them go to town with it. DO NOT guide them in anyway. Sure, if they need help squeezing the glue give them a little help, but make sure they are placing each piece where they want it. If they want a mouth on the forehead and seven eyes on the chin, let them. This is their creation.
 There are times when you are doing projects where you might guide your child to using the correct color or putting the pieces in the correct place because you want to teach them about that specific object you are making. This is not one of those times. Let them have fun with this and create their own masterpiece. Some kids may want to put the parts in the right place and that is okay too. If anything, it can teach us to recognize and embrace the sweet and unique personalities each child has.
 I decided to do clowns because they are already silly to begin with. I pre-cut different shapes that could be used for parts of the clown face, put out a pile of googly eyes and a couple bottles of glue and let the kids create their masterpieces.
by Jamie Hinckley on Oct 13, 2011
One of my favorite childhood books was The Very Hungry Caterpillar. I loved reading it and looking at all the colorful illustrations. It just so happened that I was assigned to teach the letter C for my co-op preschool program my 3 year old participates in. Ah ha! Perfect reason to pull out my old book!
We learned about caterpillars, pretended we were caterpillars, and painted caterpillars! It was a fun day! The paintings turned out so cute I had to post them!
I gave all the kids cotton rounds and paint and let them have at it. I wouldn’t recommend doing this project without layering the table with newspaper first. The kids sort of went nuts painting the newspaper after they ran out of cotton rounds. 
Another great trick that helps with clean up is to mix soap in the paint. It can be dish soap or even hand soap. I use it even if the paint is washable; it just makes spills and hand washing that much easier to clean.
Materials: I used cotton rounds for the body, yarn for the smile, and googly eyes. These items could be switched out for pretty much anything similar you have around the house.
 I had the kids color with greens and browns for the backround. I am a little biased, but they turned out great!
Check out this Clown craft for another letter C activity!
by Dana Patterson on Oct 11, 2011
Got 20 minutes? I’ve been searching around to find some fun Halloween crafts for my 2 year old. This was perfect for her attention span and it is something great for me to keep and do every year for memories!

Here is Ella’s Footprint Ghosts!

Both Handprints for Spider
Supplies Needed:

Paper towels, black paint, white paint, 2 big brushes, 2 little brushes, two pieces of contruction paper (you can choose colors)
- Paper Towels: I wet like 5 of them to clean off paint from hand and foot right away
- Black Paint: used for handprint spider, ghosts eyes and mouths and for spider eyes
- White Paint: used for ghosts footprints and spider eyes
- Two big paintbrushes: used to paint feet and hands
- Two small paintbrushes: used to paint eyes and mouths
- Two pieces of construction paper: used for base
Ghosts Directions
Paint feet white with brush

Ella’s foot painted white
Put foot directly on construction paper, repeat with other foot.

Here is the base of your ghosts
Paint Eyes and Mouth on your Ghosts (I also put Ella’s name and year on it, for memory sake) and you’re done!
Spider Directions
Paint hand black minus the thumb

Ella’s hand painted black minus her thumb
Put one hand on the paper and clean hand
Paint other hand and do it the opposite way

Ella’s handprint spider before eyes
Paint white circles with black dots in them.
You’re done!! Such an easy and fun project!!
by Jamie Hinckley on Oct 08, 2011
I got a call from my mother-in-law today. It was a familiar call… she always calls a week or two after her grand kids visit to get nostalgic about all the cute little fingerprints on her walls that have finally faded away and to beg us to come back to visit soon. The fingerprints I spend hours cleaning with a magic eraser are cherished and endeared by her.
I looked at my house with this new perspective and saw all the little fingerprints all over my walls. If there is one thing that defines our lives as mothers, there it is. Perfect… what defines a life full of little children if not the fingerprints they leave behind! They are a reminder of the fun and chaos that defines them.
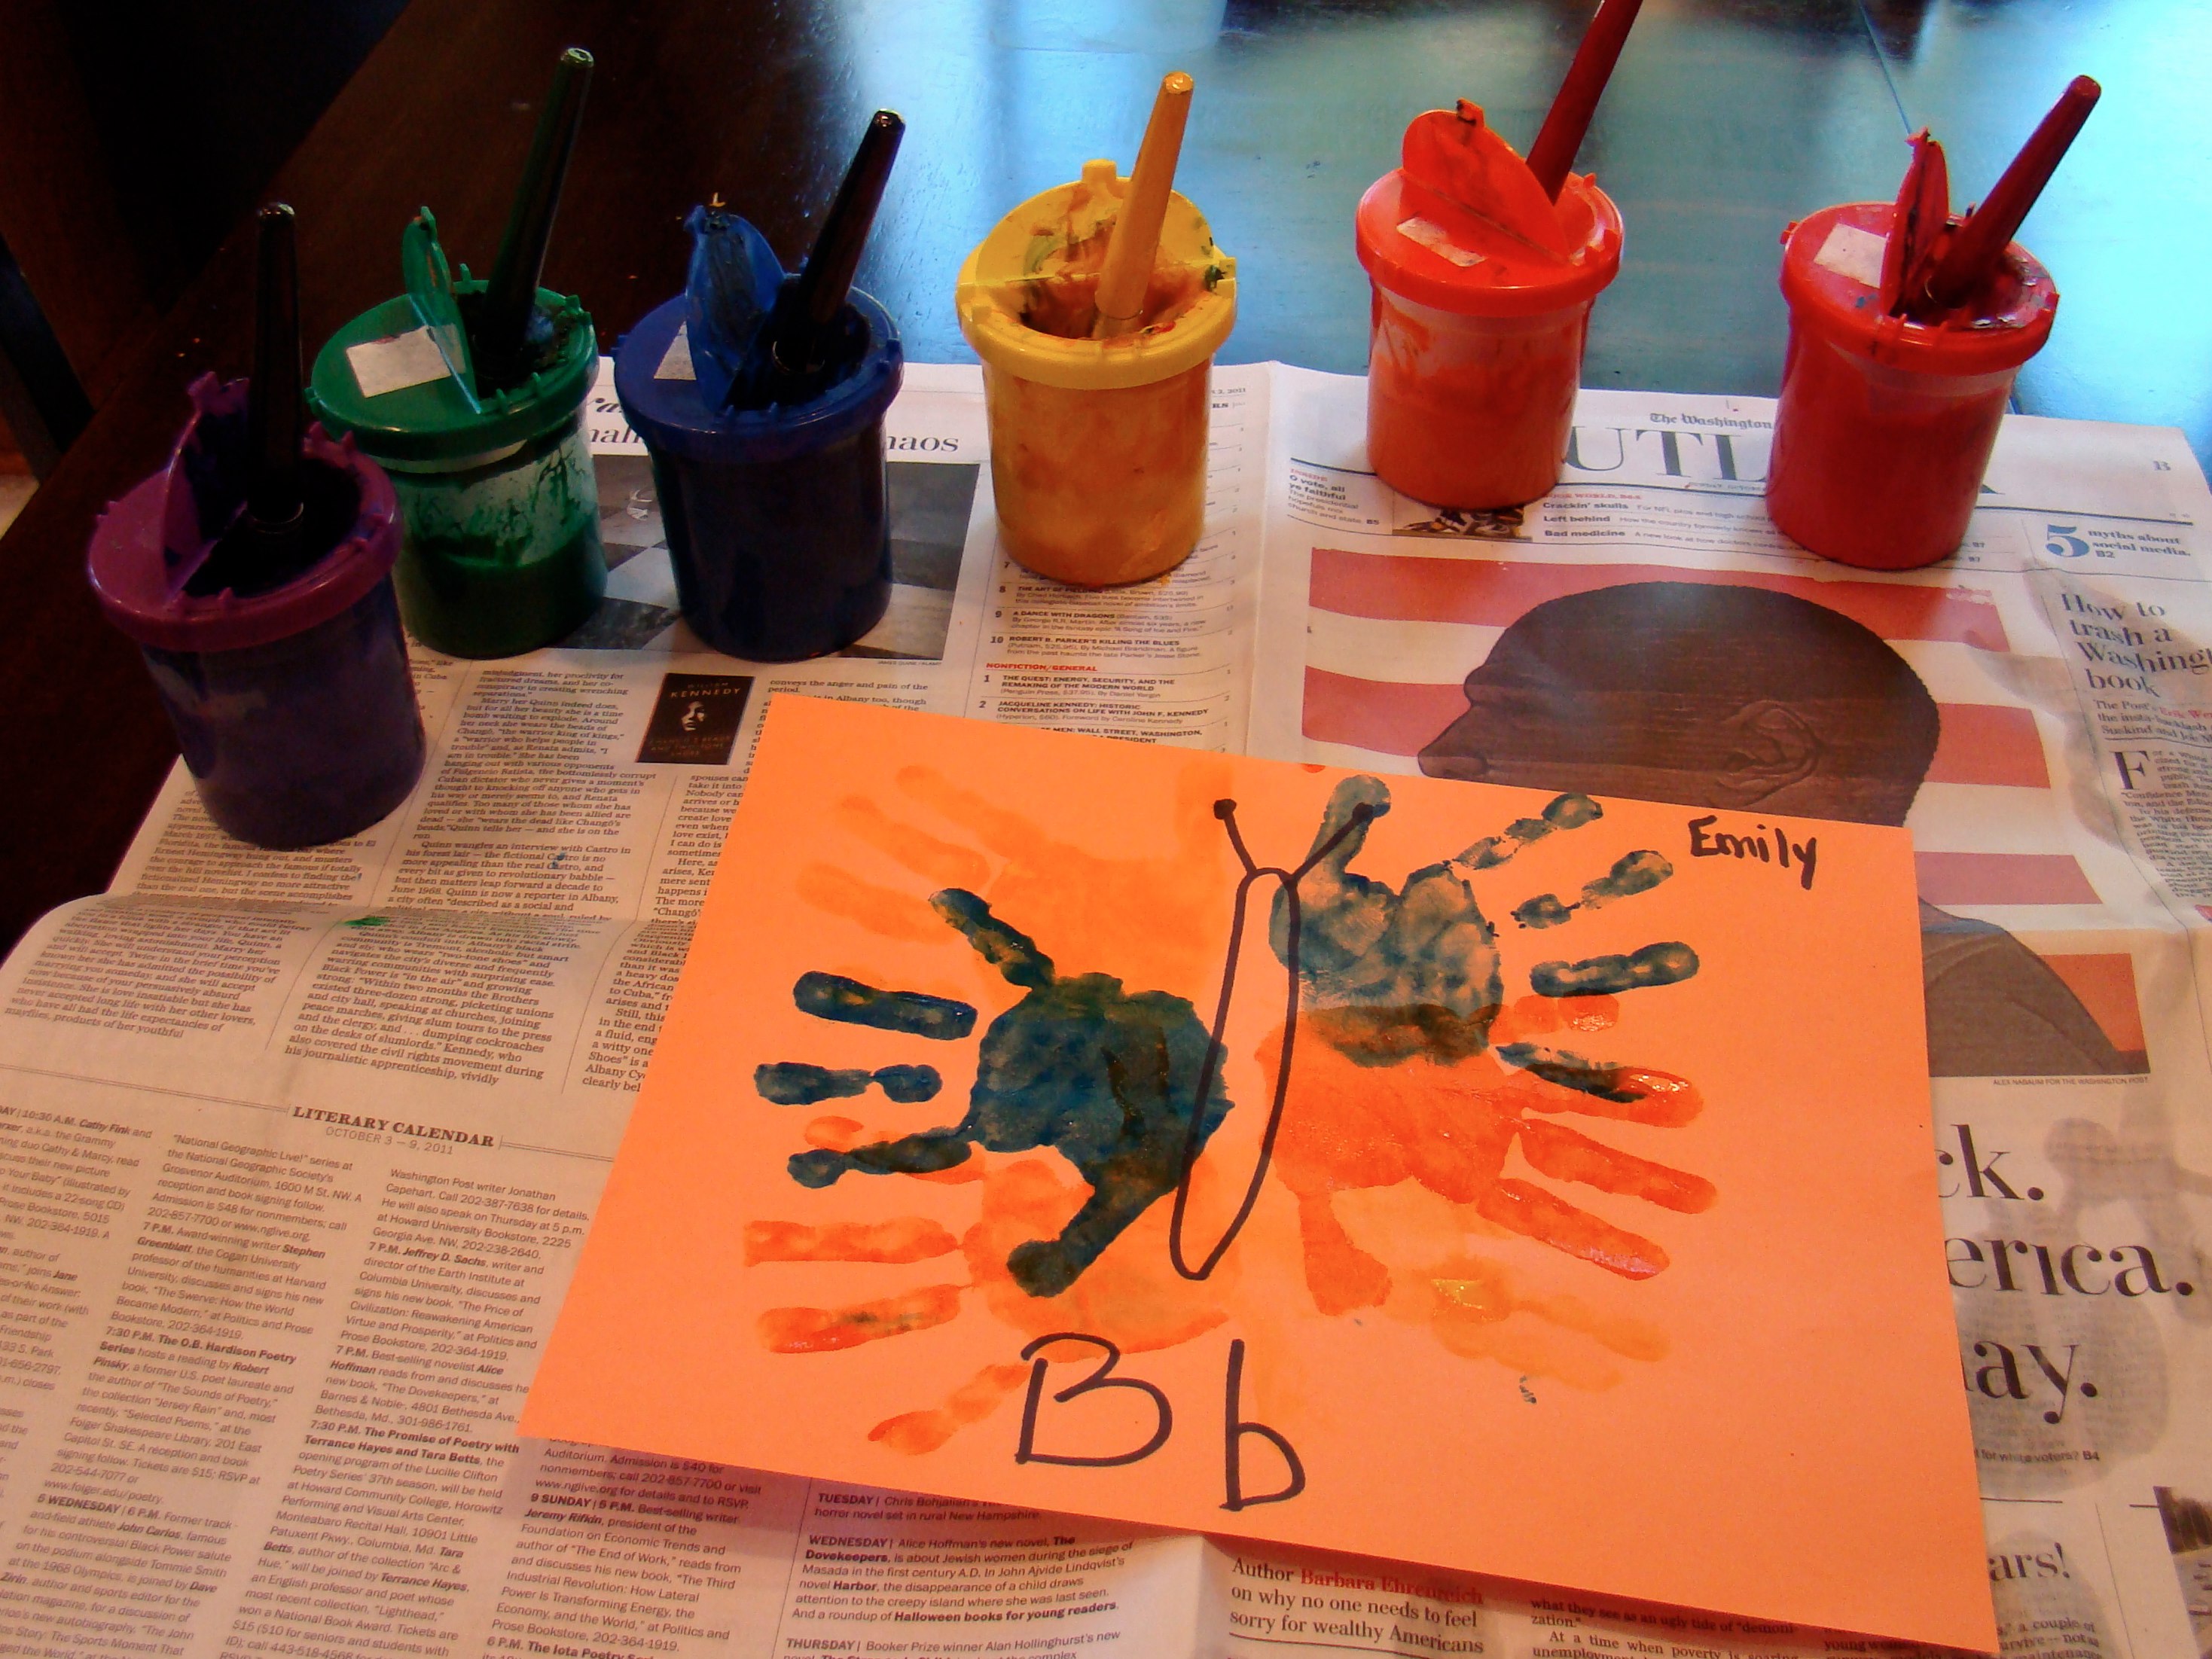
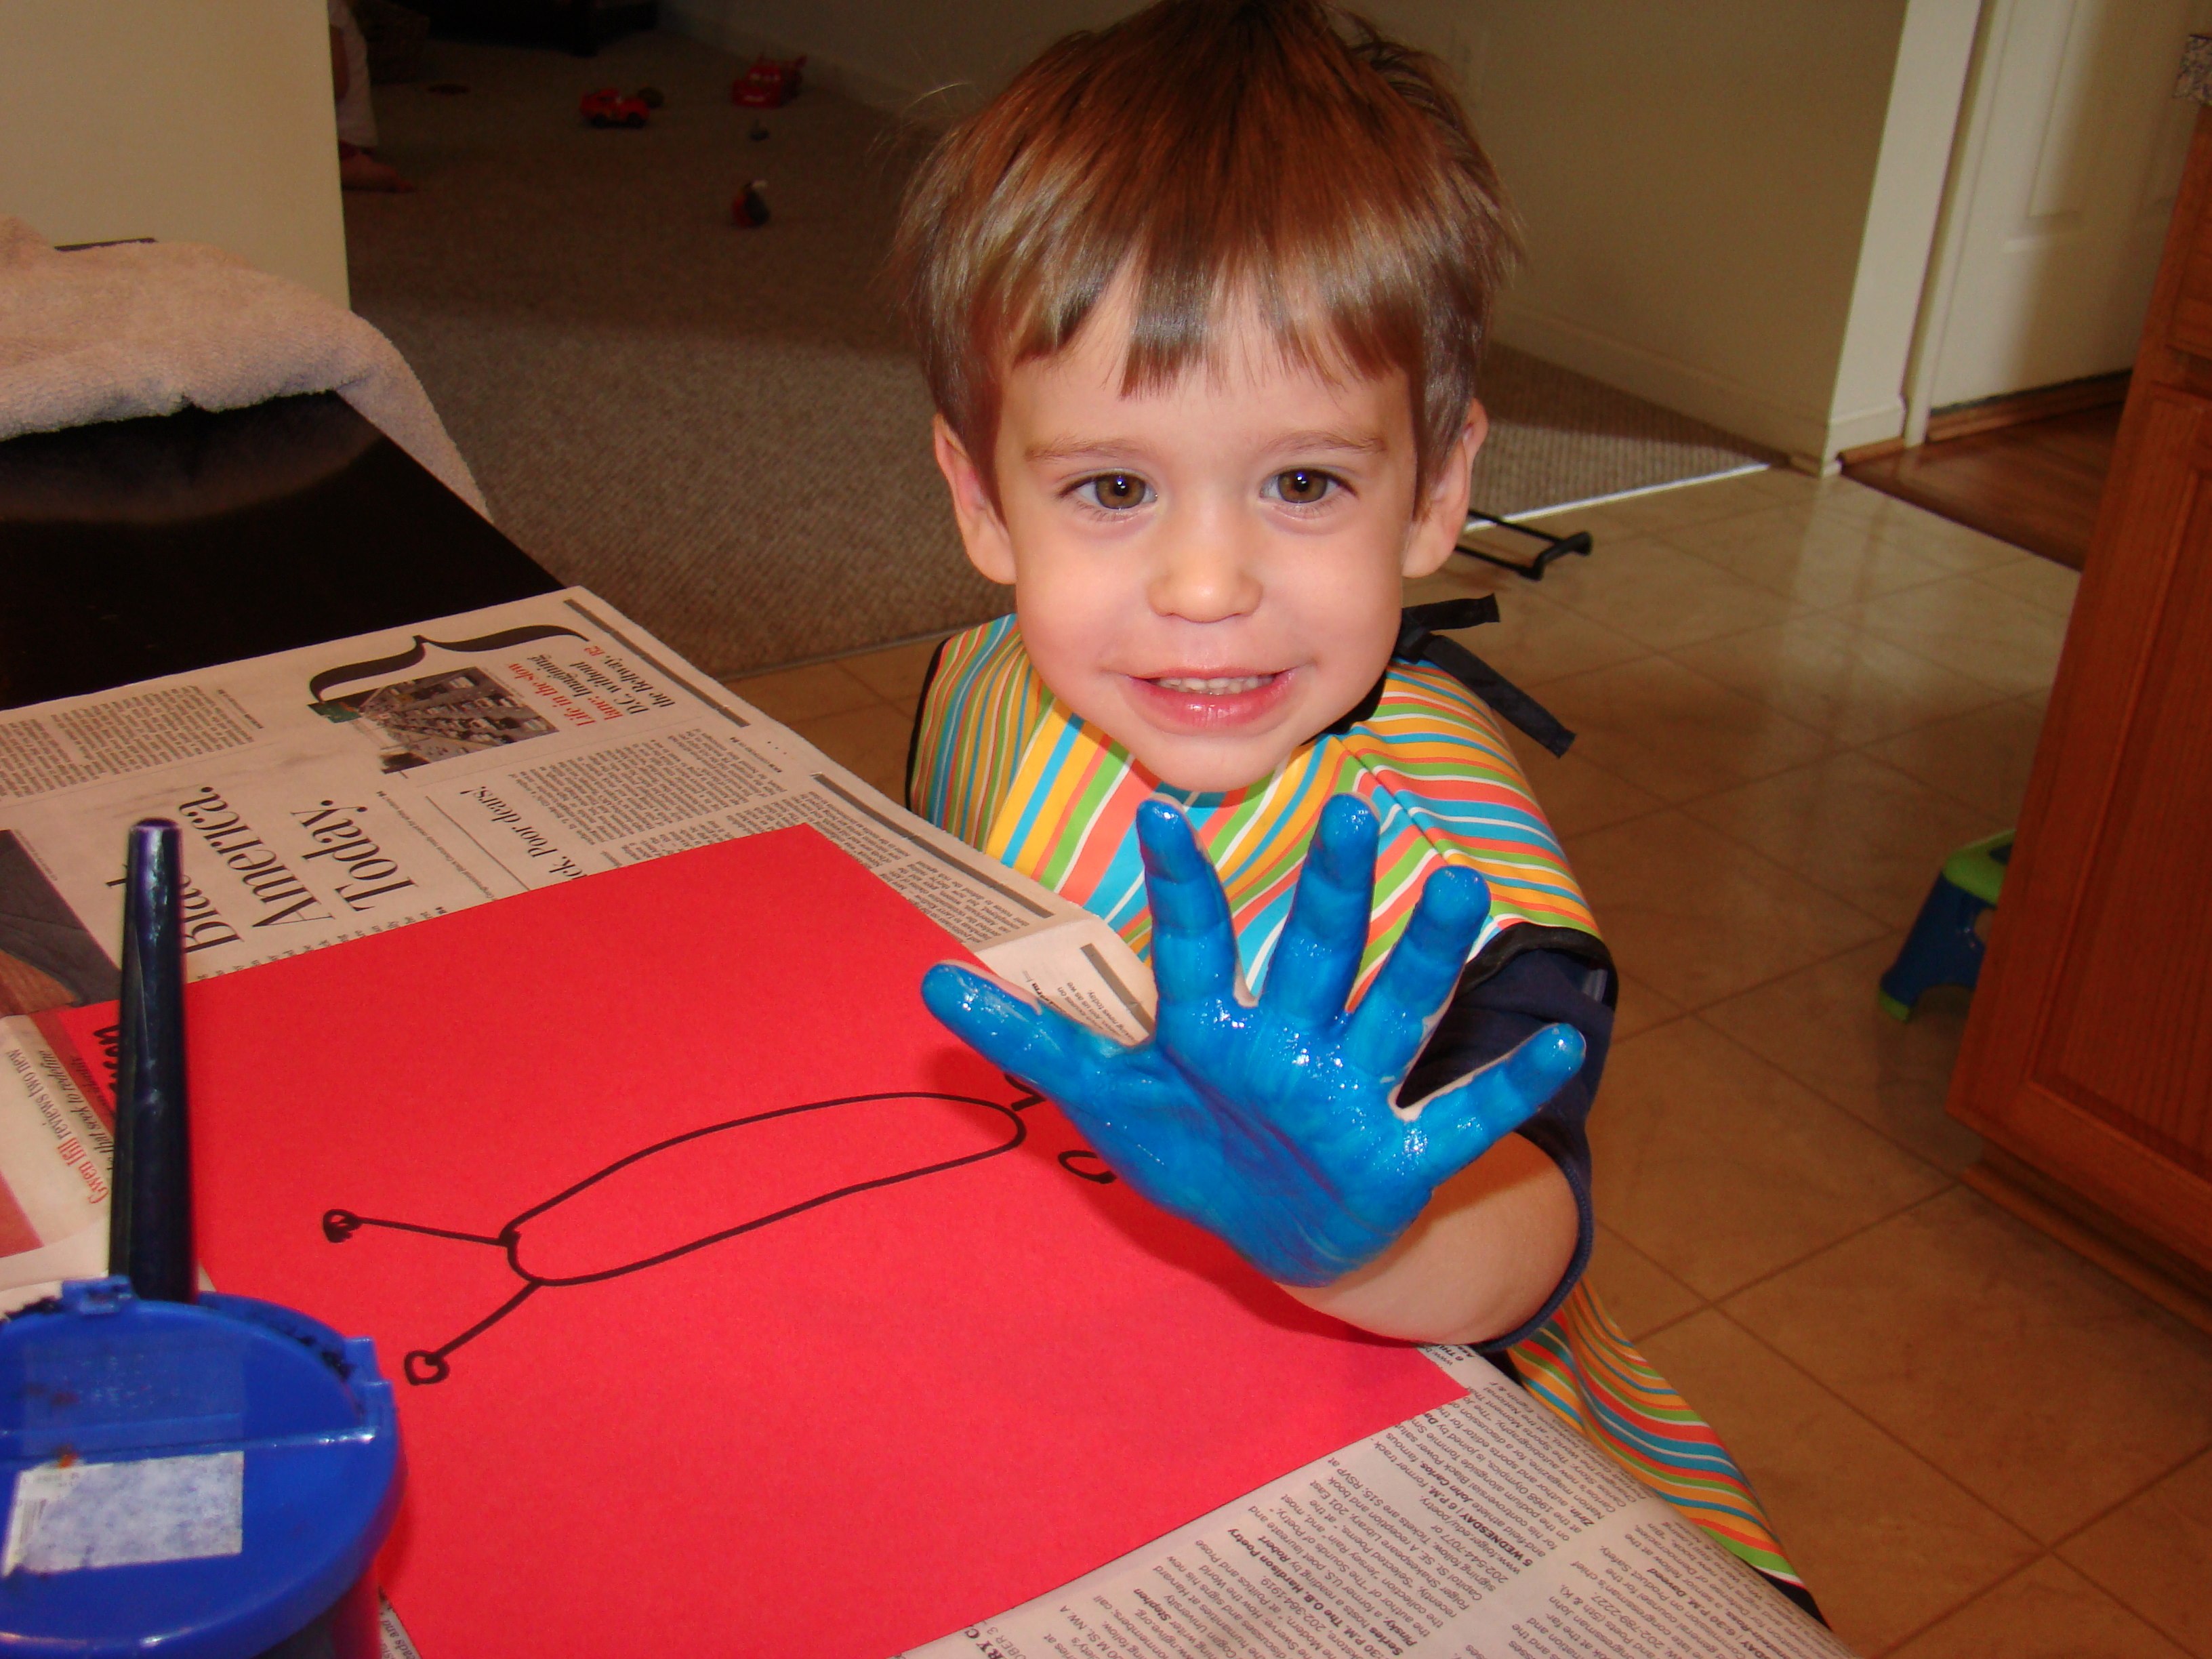
I thought it would be fun to start off the blog with a great hand print butterfly project! I have been doing this project for years now. It is always a lot of fun to see how the kids react to the cold paint and ticklish brush on their hands. This is a great activity for sensory development. It has the potential to be messy, but is so worth it. Sensory activities help promote social, emotional, and intellectual development so have fun and keep a soap bucket close by!

Supplies: paint, brushes, paper, bucket of soapy water
Instructions: Draw the body of a butterfly without the wings. Paint your child’s hand and let them place it on on the side of the butterfly body. The hand print will be the butterfly wings. Use as many colors as you want to make the butterfly wings colorful.


