by Jamie Hinckley on Mar 16, 2012
This is one of my favorite snacks! It’s really my mom’s genius recipe… she has been making it for as long as I can remember. Movie nights as a kid, long car trip snacks, game night treats, party treats, or just because treats! I always loved them and have many great memories eating them! Later I began making them for my roommates at college and even later for my own family.

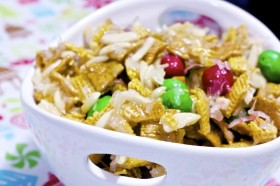
It’s easy to make and is seriously so good! Perfect game time snack! I couldn’t resist making it with Easter m&m’s!
Chewy M&M Chex Mix
1/2 box Golden Grahams cereal
1/2 box Honey Nut Chex cereal
2 cups shredded coconut
1 cup slivered almonds
1 bag m&m’s (any kind you like)
1 stick butter
1 cup granulated sugar
1 cup Karo syrup
***Mix cereal, coconut, and almonds in the largest mixing bowl you can. Melt butter, karo syrup,and sugar in a saucepan over medium heat. Bring to a boil stirring constantly. Let it boil for at least two minutes, but keep stirring. Poor over cereal mixture and mix using a strong spoon. After a minute, dump in m&m’s and keep mixing. I always add the m&m’s a minute later so that they don’t melt. My mom would tell you to keep stirring until the mixture cools, but I cheat! Once it is all combined well I spread it out on the counter on top of some parchment paper or tinfoil to cool. These keeps it from getting all stuck together in one giant ball.

So yummy! I could just dive in!

Great snack to bring to a party!

**Update**
I just made the Christmas version of this recipe! Check out the colors!
Love how you can make it for each holiday! Merry Christmas!!
by Dana Patterson on Mar 15, 2012

Such a yummy dish!
Remember my recipe party?!?! Well, this was one of the dishes that I made. It is another awesome meal to take to your new mommy friends too (notice I say this a lot, I was SO appreciative of all the meals I received!).
Here is what you need:
- 3 chicken breasts
- 2 bunches of broccoli
- 1 can cream of chicken
- 1 cup milk
- 1 cup mayo
- 1-2 teaspoons curry powder (we like curry so I go with 2)
- 1 cup shredded cheese
- salt and pepper to taste
Directions:
- Bake Chicken on 350 degrees for 1 hr then cut up into cubes (this is what I did last time) or cut into cubes and cook on stove top with some oil (less time). I put some salt and pepper on it before baking.
- Cut up broccoli and steam. (I put a little bit of water in a pot and throw the broccoli into the strainer and put a lid on it and I also seasoned with salt). Do not over cook the broccoli.
- Meanwhile, mix milk, mayo, cream of chicken and curry powder into a bowl.
- Put chicken and brocoli in a 9×13 pan and pour mixture over it.
- Top with cheese.
- Put in oven on 350 degrees for 30 minutes.
- I served over brown rice!
Wahlaaaaaaaa:

Delicious Chicken Casserole
Even my adorable 11 month old loved it!

Even my 11 month approves!
Can’t beat that for cute! Happy cooking! Let us know if you make it!!!
by Jamie Hinckley on Mar 13, 2012
Looking for a fun St. Patrick’s day treat for the kiddos? I came across this recipe from Betty Crocker. Green and cute, but with lots of mint and chocolate flavor. Simple recipe and the grown ups will like it too! I love the mint taste in these!

Mint Chocolate Chip Cookies
Any sugar cookie dough you want (homemade, mix, premade… doesn’t matter)
6 – 8 drops of food coloring
1/2 tsp mint extract
1 cup Creme de Menthe baking chips
1 cup chocolate chips
***Make up your sugar cookie dough, add the food coloring and mint extract and mix well. Gently stir in creme de menthe baking chips and chocolate chips. Bake the cookies how your sugar cookie recipe directs (although mine needed an extra few minutes).

Most important ingredient! So yummy! You can find them in the baking section in your local grocery store.

The dough is yummy too! Love the chocolate mint flavor in these!


by Dana Patterson on Mar 06, 2012

Literally falling off the bone!
I always noticed the whole chickens in the grocery store and was almost afraid of them. I had no clue what to do with them. It was priced so much cheaper than chicken breasts (which were always my go to), that I thought I would give it a try. I looked up a recipe from food dot com and I found this one. It was even better that it was a crock pot recipe.
Here is what you need:
- 2 teaspoons salt
- 2 teaspoons paprika
- 1 teaspoon cayenne pepper
- 1 teaspoon onion powder
- 1 teaspoon thyme
- 1 teaspoon white pepper
- ½ teaspoon garlic powder
- ½ teaspoon black pepper
- 1 large roasting chicken (with pop-up timer if possible)
- 1 cup chopped onion (optional)
How to make this good lookin’ chicken:
-
In a small bowl, combine the spices.
-
Remove any giblets from chicken and clean chicken.
-
Rub spice mixture onto the chicken.
-
Place in resealable plastic bag and refrigerate overnight. (I skipped this because I didn’t think about it until the day of).
-
When ready to cook, put chopped onion in bottom of crock pot.
-
Add chicken. No liquid is needed, the chicken will make it’s own juices.
-
Cook on low 4-8 hours.

Look at this beauty!
Wahlaaaaaaaa…. Now you have yourself a pretty chicken! We ate this for a few meals. So delish!
by Jamie Hinckley on Mar 02, 2012
The fluffiest peanut butter cookies on the planet! Seriously, I am not kidding here! They are so good!
My boys have been begging for the past week for me to make some cookies. I have been refusing because I have no will power as of late and I know if I make them I will REALLY enjoy eating them! I started to feel bad though and caved to their sweet little faces. However, I decided that if I was going to make them then I was going to make sure it was worth it! I started searching pinterest for the most delectable fluffy cookies and was thrilled to find these at howsweeteats.com.
Seriously, next time you are in the mood for some fluffy, chewy, chocolatey goodness… MAKE THESE! 🙂 I was actually torn between trying this recipe or trying a similar one that included oatmeal. I love oatmeal cookies so after using half the dough I mixed 1/2 cup of oats in the rest of my dough so I could have both. Love them, loved them, loved them! The oats gave them a great texture. I will add oats to the entire batch next time. Drool, drool…
I was hoping to tell you how they taste the next day, but they did not last that long! Guess that is what happens with 3 little monkeys (and a mom with no will power… hehe).

These ones have the oats added.... mmmmm

Adding the melted peanut butter to the sugars
Peanut Butter Chocolate Chip Cookies
Adapted from www.sweeteats.com
Makes 18 cookies (although my batch made 30 so clearly I didn’t make mine as big as recommended)
1/2 cup salted butter
6 Tb peanut butter (I didn’t measure just estimated since it is just over 1/3 cup)
1/2 cup sugar
1 cup brown sugar
2 cups flour
1/2 tsp baking soda
1 egg + 1 egg yoke
2 tsp vanilla
1 1/2 cups chocolate chips
1 cup Oatmeal (optional, but I am telling you it is delish!)
1. Melt the butter and PB together in the microwave for about 30-40 seconds. Mix and let cool completely.
2. Wisk flour and baking soda together and set aside
3. Mix both sugars and PB mixture together in large bowl
4. Add egg, egg yolk, and vanilla and mix well.
5. Slowly add flour. Mix until just combined. You may need to add 2 Tb of milk if your dough is too thick (I did).
6. Stir in chocolate chips (and oatmeal if you are adding it)
7. Bake at 325 degrees for 10 to 12 minutes. Do not over bake. Cool completely on rack.

No oats in these ones, but still oh so good!

Nice and fluffy inside! Love these cookies!
by Dana Patterson on Feb 27, 2012
You know how much I love recipe parties. Last year, my neighbor had one and gave away this recipe. It is so delish and there are always plenty of leftovers for lunch the next day. This is also a great recipe to take to a brand new mom (always do something for your new mom friends).

yum yum
All you need is:

can of rotel, cream of mushroom soup, cream of chicken soup, chicken broth, thin spaghetti, cheddar cheese, 1 lb chicken tenders, 1/4 cup chopped green peppers, 1/4 cup chopped onions, 1 1/2 cups water, salt, pepper, garlic salt
1 10 oz. can chopped Rotel
1 can cream of mushroom soup
1 can cream of chicken soup
14 oz. thin spaghetti
1 cup of grated cheddar cheese
1 pound of chicken tenders (I cut mine up)
1/4 cup chopped green peppers
1/4 cup chopped onions
1 1/2 cups water or chicken broth
salt, pepper, garlic salt (to taste)
Directions:
Bake chicken on baking sheet in oven: 350 degrees for 1 hr 15 minutes– cut up into bite size pieces.
Heat Rotel, soups, broth, onion, bell pepper and seasonings. Add 1/2 cup cheese.

cooking all together
Cook spaghetti.
Mix chicken, sauce and spaghetti. Put into 9 x 13 baking dish. Sprinkle remaining cheese on top. Cook on 350 for 30 minutes.
Wahlaaaaaaaa.

so delish!
by Jamie Hinckley on Feb 24, 2012
Last year I ordered one of those grass-fed steers from a local farm in my area. Seriously, one of the best things we ever did. We got A LOT of fresh beef at a cost that was better than what you pay per pound out a grocery store and the meat was fresher, leaner, safer, and much better tasting.
I looked in the freezer last week to see what I could make and noticed my last piece from this order in there. It was a beef brisket. I had never cooked brisket and didn’t really know what to do with it… hence it was the last piece. So I set up to research the best way to cook brisket and the best recipe. I checked lots of websites and talked to my brother who has worked at a fresh bbq joint for years now.
I don’t want all that research to go to waste so I figured I would let you all piggy back on the research I did and tell you the best brisket recipe out there! I used a combination of information to come up with this recipe. It turned out perfect! It was tender, juicy, and delicious!
All the information I came across told me a dry rub was best and not to add any liquid to the pan as it roasts. The brisket is fatty enough on its own that you really don’t need to add any liquid to it. Also, if you are picking out a brisket, do not get the corned-beef brisket. You wil not have the same results.
Here is what I came up with for the dry rub:
DRY RUB:
2 Tb salt
2 Tb black pepper
1/2 Tb red pepper flakes
2 Tb garlic powder
OTHER INGREDIENTS YOU WILL NEED:
1 large onion
2-3 sweet potatoes
2 cups of baby carrots

You want quite a bit of spice for your dry rub. Use every bit of it.

Rub the spices over every piece of the meat, even crevices. As you can see, it is a lot of spice! Don’t be scared!
INSTRUCTIONS:
You do not need to brown the brisket as you would with tradition beef roasts. The trick to the brisket is to cut up 1 whole onion and place it in the middle of your roasting pan in one big pile. Lay the brisket directly on the onions with the fattiest side facing up. This allows the juices from the fat to drip through the meat and keep it tender and flavorful. Cover the pan tightly with tinfoil and slow roast on 250 degrees for 5 to 6 hours. This is for a 5-6 lb brisket. You will need to adjust the time for larger or smaller cuts. Let the brisket sit for 20 minutes before carving. This allows the juices in the meat to redistribute and gives you a much more flavorful taste.
WHAT TO DO THE LAST HOUR:
Add some freshly cut vegetables the last hour of baking. Some recipes said it was fine to leave them in the entire time, but I feel like the vegetables always turn to mush. I like my vegetables tender, but not to soggy or mushy. I added freshly cut sweet potatoes and carrots sprinkled with salt, paper, and onion flakes. Then I covered it back up with the tinfoil and let it roast for one more hour. The vegetables were perfect. They absorbed the juices and spices from the brisket and had a great flavor to them.

Sweet potatoes cut and ready to go in for the last hour of roasting

Carrots and sweet potatoes are placed all around the roast so they can absorb the juice and flavor from the brisket. I always put the carrots towards the bottom as they are a much firmer vegetable and can cook better at the bottom.

Perfection! Add a small side salad to this and you are set! This is a great meal to have with company!
by Jamie Hinckley on Feb 21, 2012
Fresh from my Grandmother’s own recipes is a the most delicious english muffin raisin bread. I always get a craving for it on cold winter days. I dont know what it is, but the smell of freshly made bread floating through your home gives such a wonderful comfortble feeling… for me it really is the feeling of home itself.
 Im sure I’ve said it before but, my mom is the master of homemade breads and rolls. She has her own recipes, most of which were passed on to her by her mom. I love that kind of history with recipes. It is so fun to know I am baking recipes that my mother and grandmother grew up making. Although I will never be able to bake as well as them, I do like to try. I found with baking any breads or rolls… it really is an art.
You have to get a feel for your dough and know when to stop adding flour and when your dough is done rising. I can tell I am getting better with each batch. When I first starting making rolls and breads I added way to much flour and had dense/thick bread instead of fluffy and soft bread. The trick is to add as little flour as you can get away with without it being too sticky to be able to form your bread/rolls.

This is what it looks like before it starts to rise

This is the dough after it has been left to rise
So I am going to share my grandmother’s recipe with you, but keep in mind I did modify it. My mom and Grandma can practically make this in their sleep so whenever I am using their recipes I have to sort of fill in the blanks. Also, my mother had seven children and my grandmother had six so all of their recipes have been meant to feed a crowd. Since I very rarely need to make 6 loaves at a time, or 5 trays of cinnamon rolls, I have to trim them down. I know it sounds easy, but if you saw their recipes written down as I do you would know what I mean.

Bread in the pans before rising

Bread in the pans after rising
English Muffin Raisin Bread
Makes 2 loafs
3 cups warm water
2.5 Tb dry yeast
1/3 cup cornmeal (whole grain if possible)
3/4 cup sugar
1 Tb salt
2 cups raisins
6 – 8 cups flour
1. Sprinkle the dry yeast across the surface of the warm water in your mixing bowl and let sit for a few months until the yeast is mostly absorbed and a bit frothy around the edges of the bowl.
2. Add the cornmeal, sugar, and salt and mix briefly
3. Add 3 cups of flour and then your raisins and mix using a bread hook
4. Gradually continually adding flour until your dough is soft, but still slightly sticky (not sticky enough that you can’t work with it).
5. Knead dough for 5-6 minutes using your bread hook (Yes grandma, I cheat and no longer Knead by hand… hope you still love me) 🙂
6. Put about a capfull of vegetable over the soft surface of the dough making sure to coat the bottom of the dough as well. Let rise until double (about 30 minutes).
7. Punch down, divide dough in half and form dough into two loaves. Coat pans with non-stick spray before putting dough in.
8. Let rise again until double (about 30 minutes)
9. Bake on 350 degrees for 25 – 30 minutes. I put tinfoil over mine the last 10 minutes so the tops do not brown too much. Remove from pans immediately and let cool completely on wire rack before wrapping up. Brush to tops with melted butter for better presentation.
This is bread is absolutely delectable with honey butter or even cinnamon and sugar toast! The key to honey butter is equal parts butter to honey. 🙂 Enjoy! I know you will be making this one for years… it is a keeper.

by Jamie Hinckley on Feb 17, 2012
So it’s my Dad’s birthday and I am in charge of bringing the cake. Yeah! Good thing, because I have really been craving some peanut butter chocolatey goodness and I am certain no ordinary cake would quench it. So how to encompass all the baked yumminess into one cake? Well, just that…. combine it all! Peanut butter, chocolate, cookie dough, brownies… did I miss anything??? Oh wait, lets make that chocolate chip cookie dough! I think we got it now!
And here it is in all its goodness! It is essentially, chocolate brownies with chocolate chip cookie dough balls, frosted first with fluffy peanut butter frosting and then lathered over with yummy chocolate frosting. Hold on while I wipe the drool from my chin… you might want to do the same! 🙂
- Can you blame me for being tempted to eat it just likes this and skipping the baking altogether???
Oh and don’t hate on me for using mixes… remember how I have three adorble, yet completely out of control monkeys boys hanging on me constantly! I just don’t always have the time to make up the real deal from scratch.
PB Frosted Chocolate Chip Cookie Dough Brownies (Wow, that’s a mouthful!)
Improved on, but inspired by bettercrocker.com
1 package brownie mix (or if you are cooler than me, make them from scratch)
Chocolate Chip Cookie Dough (use your favorite recipe or cheat and buy premade dough or a mix)
Whatever ingredients you need to make your brownies
Chocolate frosting (again I used a Betty Crocker container…. don’t judge) 🙂
PB Frosting
1/2 cup butter, softened
1 cup creamy peanut butter
3 Tb milk (or as needed)
2 cups confectioners sugar
*Mix the brownie batter as directed and pour into 9 x 13 pan. Drop rounded teaspon balls of cookie dough evenly into your brownie mix. Bake at 350 degrees for 35-45 minutes or until toothpick comes out almost clean. Mine was done in less than 40min. Let cool for 30 minutes or so on a wire rack.
*Make the PB frosting by beating peanut butter and butter together. Add sugar and mix again. Add milk as needed to get desired consistency. Make sure to beat for at least 3 minutes to get it nice and fluffy!
*Frost the brownies first with the PB frosting then cover it with the chocolate frosting. Doesn’t’ get better than that! It gets a little gooey spreading the chocolate, but it looked nice and smooth when I was done. So good!
You should have heard and tasted the compliments I got on this from my family while celebrating my Dad’s 57th birthday! So good… It is definitely a keeper!
by Dana Patterson on Feb 06, 2012
I always take something to anything we are invited to. I feel like the host has gone through so much effort to make it a great evening, the least I can do is bring something. Most of the time it’s either a dessert or appetizer. If I don’t have a lot of time, I usually make this. It’s so delicious and EVERYONE asks for the recipe. This past weekend, I helped host my friends bridal shower. I brought this spinach dip and homemade hummus (recipe to come later). This is Hidden Valley’s recipe. Look at how cute it is:

The Hawaiian bread makes it look really good!
All you need is:
Water Chestnuts
16 oz. Sour Cream
Box of Chopped Spinach (thawed, rinsed and completely drained)
Ranch Dressing Packet
Kings Hawaiian Bread

All you need is spinach, diced water chestnuts, sour cream, ranch dressing packet and Hawaiian bread.
Dice up water chestnuts.
Make sure spinach is completely dry.
Mix all together and put into bowl to let sit for at least 30 minutes (I did mine over night).
Cut out hole in bread and serve. Wahhhllaaaaaa
I should have made this post before Super Bowl. It would have been something perfect and easy you could have taken to a party. Lay off all the store bought stuff when you go places, it just makes you look lazy!!!


