Do you remember my previous bunny craft? Here is another cute bunny idea! Thank you pinterest! The actual blog is here. Check it out!
Cute bunny!
My daughter begs for crafts, so I have to get creative (or look on pinterest). I found this craft and had everything we needed. Here is what I used (a little different than what was in the link):
paper plate (I cut the outside ring off. The other site calls for large white card stock).
three pipe cleaners (two black one pink)
cotton balls
2 larger googly eyes
white construction paper
pink construction paper
glue
3 pink pom poms
This is another pretty self explanatory craft. It’s also a lot of fun for a two year old. Here she is:
This is one of my favorite snacks! It’s really my mom’s genius recipe… she has been making it for as long as I can remember. Movie nights as a kid, long car trip snacks, game night treats, party treats, or just because treats! I always loved them and have many great memories eating them! Later I began making them for my roommates at college and even later for my own family.
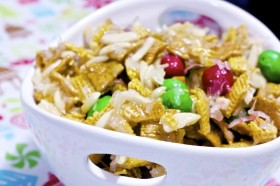
It’s easy to make and is seriously so good! Perfect game time snack! I couldn’t resist making it with Easter m&m’s!
Chewy M&M Chex Mix
1/2 box Golden Grahams cereal
1/2 box Honey Nut Chex cereal
2 cups shredded coconut
1 cup slivered almonds
1 bag m&m’s (any kind you like)
1 stick butter
1 cup granulated sugar
1 cup Karo syrup
***Mix cereal, coconut, and almonds in the largest mixing bowl you can. Melt butter, karo syrup,and sugar in a saucepan over medium heat. Bring to a boil stirring constantly. Let it boil for at least two minutes, but keep stirring. Poor over cereal mixture and mix using a strong spoon. After a minute, dump in m&m’s and keep mixing. I always add the m&m’s a minute later so that they don’t melt. My mom would tell you to keep stirring until the mixture cools, but I cheat! Once it is all combined well I spread it out on the counter on top of some parchment paper or tinfoil to cool. These keeps it from getting all stuck together in one giant ball.
So yummy! I could just dive in!
Great snack to bring to a party!
**Update**
I just made the Christmas version of this recipe! Check out the colors!
Love how you can make it for each holiday! Merry Christmas!!
Remember my recipe party?!?! Well, this was one of the dishes that I made. It is another awesome meal to take to your new mommy friends too (notice I say this a lot, I was SO appreciative of all the meals I received!).
Here is what you need:
3 chicken breasts
2 bunches of broccoli
1 can cream of chicken
1 cup milk
1 cup mayo
1-2 teaspoons curry powder (we like curry so I go with 2)
1 cup shredded cheese
salt and pepper to taste
Directions:
Bake Chicken on 350 degrees for 1 hr then cut up into cubes (this is what I did last time) or cut into cubes and cook on stove top with some oil (less time). I put some salt and pepper on it before baking.
Cut up broccoli and steam. (I put a little bit of water in a pot and throw the broccoli into the strainer and put a lid on it and I also seasoned with salt). Do not over cook the broccoli.
Meanwhile, mix milk, mayo, cream of chicken and curry powder into a bowl.
Put chicken and brocoli in a 9×13 pan and pour mixture over it.
Top with cheese.
Put in oven on 350 degrees for 30 minutes.
I served over brown rice!
Wahlaaaaaaaa:
Delicious Chicken Casserole
Even my adorable 11 month old loved it!
Even my 11 month approves!
Can’t beat that for cute! Happy cooking! Let us know if you make it!!!
Looking for a fun St. Patrick’s day treat for the kiddos? I came across this recipe from Betty Crocker. Green and cute, but with lots of mint and chocolate flavor. Simple recipe and the grown ups will like it too! I love the mint taste in these!
Mint Chocolate Chip Cookies Any sugar cookie dough you want (homemade, mix, premade… doesn’t matter)
6 – 8 drops of food coloring
1/2 tsp mint extract
1 cup Creme de Menthe baking chips
1 cup chocolate chips
***Make up your sugar cookie dough, add the food coloring and mint extract and mix well. Gently stir in creme de menthe baking chips and chocolate chips. Bake the cookies how your sugar cookie recipe directs (although mine needed an extra few minutes).
Most important ingredient! So yummy! You can find them in the baking section in your local grocery store.
The dough is yummy too! Love the chocolate mint flavor in these!
My cute husband found this video and I had to share. What a GREAT idea. I just love how he kisses her belly. It will be awesome for them to show Amelie when she gets older!
Share this with all of your newly pregnant friends.
We did a lot of fun stuff this week for preschool. The thing I like about this preschool swap arrangement is that I only teach every four weeks. It works out great because you don’t get burnt out and you have plenty of time to come up with creative things to do when it is your turn.
So its letter R for me! Here are some of our letter R activities for Preschool.
Letter R Activities for Preschool
R is for Rainbow! There are so many fun rainbow crafts to do! I really had to pick a couple of them so I would have time to do everything else. The rainbow cupcakes were the kids favorite of course! They were pretty simple too!
All you need to do is use white or yellow cake mix and prepare it as the directions say. Divide the cake batter equally between 4 or 5 bowls and add food coloring to each bowl. Put a small scoop of each color in the cupcake papers and bake as directed!
This is a great cross curricular activity since it includes language arts for the letter R, life skills in baking, and science for food coloring. The kids really enjoyed helping mix the colors together and scooping them into the cupcake tin.
The easiest why to get your frosting in your pastry bag!
Yummy!
We also made some rainbows out of fruit loops! How cute are these! Click here to download your own rainbow/fruit loop template. I wouldn’t leave your final project out on the counter unsupervised if you have a dog… I made that mistake!!!
We also read “The Little Red Hen” and “Little Red Riding Hood” during circle time. I had the kids raise their hands every time they heard me say the word RED. Then we made collages out of everything RED we could find!
I am very partial to Easter! I love all the hunts and the reason for the season, BUT I especially love it because my husband asked me to marry him on Easter (yes, my ring was in an egg). So, here is my girl’s first Easter craft.
All you need is:
white cup
pink grass
googly eyes
pink pom pom
white pipe cleaner
pink and white construction paper for ears
school glue
glue gun
It’s pretty self explanatory. I had to use a glue gun for the pipe cleaner (I used one and cut it in half and then cut it in half again). We did the ears first and my 2 year old immediately saw that it was a bunny.
Alright, listen up… Everyone with kids should own Magna-Tiles! They are great!
I like to rotate my toys every few months so that when my kids start getting bored with some I rotate in another batch they haven’t seen in a while and they get all excited to be reunited. Magna-tiles are the only ones I don’t rotate out… and that is because they are the only toys the kids play with every single day. They never miss a day playing with them. They never get bored with them and they are finding new ways to play with them as they get older.
Magna-tiles are basically flat magnetized building blocks. They come in a 100 piece set or a 32 piece set. You can get them in solid colors or a colored translucent set. There are five different geometrically sized shapes in the set and it is suggested for ages 3 and up.
I first got magna-tiles for my little guy’s 4th birthday almost 3 years ago. He loved them and built the most interesting things! His 18 month old brother also loved them. Neighbors, friends, cousins, boys or girls come over and they always want to play with them. Even my 10 year old nephew will play with them when he comes over.
I babysit 2 little boys full time and have 3 boys of my own. The magna-tiles are incredibly durable! The boys often throw them around and once even went through a phase where they built towers and then jumped off the couch to land on them! They have withstood and are still in great shape 3 years later.
Here are few of the creative things my kids have done with the Magna-tiles:
Built by a four year old!
They called this “TheTemple”
So proud of his castle!
My six year old built this before school
The boys like to make castles, towers, temples, you name it! They like to build them up and wreck them. They love to build super hero forts and keep their action figures in them. My two year old builds garages to store his favorite cars.
My 18month old building
A five and six year old playing
Here is my list of pros:
Creativity, Creativity, Creativity!!!
Loved by all ages
Durable
Gives familiarity with shapes
Increases fine motor skills
Develops cognitive thinking by teaching spacial relationships, math, logic, and problem solving
And now for the Cons:
A bit expensive ($120ish for a pack of 100 or $50ish for a set of 32)
Wrecked magnet towers are often scattered across the floor!
I started by buying the 32 piece set of magna-tiles and as soon as they arrived I realized they just wouldn’t do and ordered the 100 piece set months later. Save yourself the time and just start with the 100 piece set. It is pricey, but I am telling you, you wont be sorry. The cheapest place I have found to buy them is here (plus they have free shipping). They will be back in stock this spring so keep a look out.
Had to add this one in here… This little guy is 2 1/2 years old and made this all by himself!
I always noticed the whole chickens in the grocery store and was almost afraid of them. I had no clue what to do with them. It was priced so much cheaper than chicken breasts (which were always my go to), that I thought I would give it a try. I looked up a recipe from food dot com and I found this one. It was even better that it was a crock pot recipe.
Here is what you need:
2 teaspoons salt
2 teaspoons paprika
1 teaspoon cayenne pepper
1 teaspoon onion powder
1 teaspoon thyme
1 teaspoon white pepper
½ teaspoon garlic powder
½ teaspoon black pepper
1 large roasting chicken (with pop-up timer if possible)
1 cup chopped onion (optional)
How to make this good lookin’ chicken:
In a small bowl, combine the spices.
Remove any giblets from chicken and clean chicken.
Rub spice mixture onto the chicken.
Place in resealable plastic bag and refrigerate overnight. (I skipped this because I didn’t think about it until the day of).
When ready to cook, put chopped onion in bottom of crock pot.
Add chicken. No liquid is needed, the chicken will make it’s own juices.
Cook on low 4-8 hours.
Look at this beauty!
Wahlaaaaaaaa…. Now you have yourself a pretty chicken! We ate this for a few meals. So delish!
The fluffiest peanut butter cookies on the planet! Seriously, I am not kidding here! They are so good!
My boys have been begging for the past week for me to make some cookies. I have been refusing because I have no will power as of late and I know if I make them I will REALLY enjoy eating them! I started to feel bad though and caved to their sweet little faces. However, I decided that if I was going to make them then I was going to make sure it was worth it! I started searching pinterest for the most delectable fluffy cookies and was thrilled to find these at howsweeteats.com.
Seriously, next time you are in the mood for some fluffy, chewy, chocolatey goodness… MAKE THESE! 🙂 I was actually torn between trying this recipe or trying a similar one that included oatmeal. I love oatmeal cookies so after using half the dough I mixed 1/2 cup of oats in the rest of my dough so I could have both. Love them, loved them, loved them! The oats gave them a great texture. I will add oats to the entire batch next time. Drool, drool…
I was hoping to tell you how they taste the next day, but they did not last that long! Guess that is what happens with 3 little monkeys (and a mom with no will power… hehe).
These ones have the oats added.... mmmmm
Adding the melted peanut butter to the sugars
Peanut Butter Chocolate Chip Cookies Adapted from www.sweeteats.com Makes 18 cookies (although my batch made 30 so clearly I didn’t make mine as big as recommended)
1/2 cup salted butter
6 Tb peanut butter (I didn’t measure just estimated since it is just over 1/3 cup)
1/2 cup sugar
1 cup brown sugar
2 cups flour
1/2 tsp baking soda
1 egg + 1 egg yoke
2 tsp vanilla
1 1/2 cups chocolate chips
1 cup Oatmeal (optional, but I am telling you it is delish!)
1. Melt the butter and PB together in the microwave for about 30-40 seconds. Mix and let cool completely.
2. Wisk flour and baking soda together and set aside
3. Mix both sugars and PB mixture together in large bowl
4. Add egg, egg yolk, and vanilla and mix well.
5. Slowly add flour. Mix until just combined. You may need to add 2 Tb of milk if your dough is too thick (I did).
6. Stir in chocolate chips (and oatmeal if you are adding it)
7. Bake at 325 degrees for 10 to 12 minutes. Do not over bake. Cool completely on rack.


